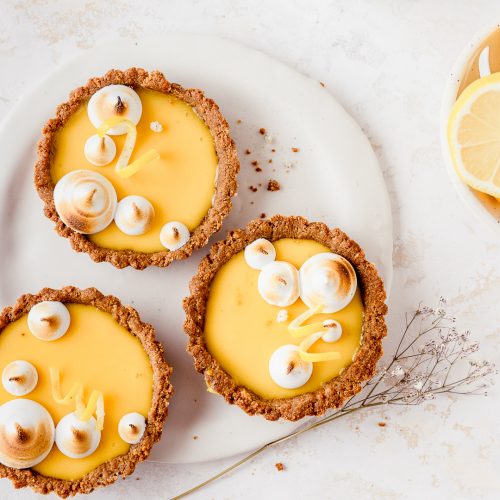
Summer Yuzu Lemon Tarts
Summer in a bite, these Yuzu Lemon Tarts have a sweet salty graham cracker crust, a creamy all-natural lemon filling, and a torched meringue.
Ingredients
for the Graham Cracker Lotus Bischoff Crust
- 1 cup (125g) Graham crackers
- 1 cup (125g) Lotus Bischoff Cookies
- ½ cup (70g) Brown sugar
- ¾ tsp (3g) Fine sea salt
- ¾ cup (168g) Unsalted butter melted
For the Yuzu Lemon Filling
- 50 g granulated sugar
- Zest from 2 small lemons can be any lemon type
- ¼ cup (60g) lemon juice can be any lemon type
- 45ml (3 tbsp) Yuzu Extract
- 100g (approx. 2) whole eggs
- 60g (approx. 2) egg yolks , reserve egg whites for Italian meringue topping
- 50g unsalted butter , at room temperature
- 1 Gelatin sheet or 1 pouch of Gelatin (approx. 2½ tsp or 7 g)
for the Italian meringue decoration
- 60g (approx. 2) egg whites
- 75g granulated sugar
- 21 ml water
- 1/2 tsp vanilla extract
Instructions
for the Graham Cracker Lotus Bischoff Crust
- Preheat your oven to 350°F and lightly grease your chosen tart pan with non-stick spray or a light coating of butter.
- Place the graham and lotus bischoff crackers into a food processor and finely pulse until it resembles fine sand. Alternatively, place in a plastic bag and crush using a rolling pin.
- Place the fine crumbs into a medium-size bowl along with brown sugar, salt and whisk together before adding melted unsalted butter, mixing together until a wet sand mixture forms that holds together when pressed.
- Press into 6 small tart pans or one larger 9” pie pan evenly, using the bottom of a flat cup to pack together. Bake the crust at 350°F for 10 minutes. Set aside to cool completely.
For the Yuzu Lemon Filling
- Bloom the gelatin (either powder of sheet) according to methods outlined above in the blog post or by following instructions on the packed. Set aside.
- Rub together half of the granulated sugar with the lemon zest in a sauce pot to release the oils from the lemons. Add in lemon juice, Yuzu extract and bring to a simmer on low heat.
- In another bowl, whisk the whole eggs, egg yolks, and remaining granulated sugar until smooth. Temper the eggs, by adding half of the simmering lemon syrup into the egg mixture while whisking to fully combine.
- Return the egg/lemon syrup mixture to the saucepan and continue to cook the curd over low heat for another 5 minutes (never boiling) or until thickened and falls off the whisk in ribbons. Be careful not to cook on high heat or it will curdle. Add in either the bloomed gelatin sheet or thickened powdered gelatin, and whisk to cook until fully dissolved.
- Immediately remove the pan from the heat and strain into a pitcher. While still warm whisk in butter and salt, until fully combined. Additionally, (not mandatory but recommended) use a hand-held immersion blender and blend to remove lumps. TIP: when using an immersion blender put the blender fully into the mixture to avoid splattering.
- Divide the filling amongst the cooled tarts and lightly tap each tart on the counter to smooth out any air bubbles. Lightly cover the top with cling wrap and chill for 4 hours or overnight until the filling is set.
for the Italian meringue - make when ready to serve
- In the bowl of a stand mixer fitting with a whisk attachment or with a hand-held mixter, whisk the egg whites in the bowl of a stand mixer on low speed until frothy and soft peaks form.
- While the egg whites are mixing, combine granulated sugar and water in a saucepan over medium heat and heat on medium low until it reaches 249°F/ 121°C. Lower the stand mixer speed to low to avoid the hot sugar from splattering up, and slowly pour the boiling sugar syrup into the bowl of whisking egg whites.
- Once all the syrup is added, add vanilla extract and return the machine to high speed and whisk for 2-3 minutes or until the bowl of the mixture is only slightly warm and stiff peaks form. *Check continuously to make sure you don't over beat. Spoon into a piping bag fitted with a round nozzle, and decorate your chill tarts. Use a blow torch to crisp the edges of the meringue topping.
Notes
NOTES:
- These tarts are best enjoyed immediately once set; however, if need be, they can be eaten up to 2 days prior to making.
- The tart shells can be made up to two days ahead, but the filling sets quickly so use it once made.