


Milk and Honey Olive Oil Cake – a cake so moist and spongy, it’s like biting into clouds. With a distinct flavor of olive oil paired with condensed milk and subtle caramel notes from honey, this is sure to be a staple during spring months!
This recipe is enough to make one 6 inch double layered cake, but you can easily half it to make one. The whipped cream is also optional, but I recommend it for the full milk and honey experience!
Wondering how I styled this cake to be picture-perfect for the camera? Check out these 10 Tips for Styling Cakes!

where is olive oil cake from, and is it healthy?
While the origins of olive oil cake are unclear, what is clear is that this cake is a classic. All baked goods require some type of fat to give it moisture, and olive oil cake, as you now may guess, uses olive oil as its main fat. Not only does olive oil make this cake spongy soft, tender and rich, but the flavor is distinctly floral.
Is it healthier than regular cakes? DEFINITELY! Extra-Virgin Olive Oil is proven to be full of healthy fats and minerals. Unlike other fats and oils, it’s full of antioxidants and has strong inflammatory properties. Bottom line is…you can have an extra slice or two of this cake with no regrets. In fact – I encourage it!
Ingredients to make milk and honey olive oil cake
INGREDIENTS:
- Extra-Virgin Olive Oil – The most important ingredient in olive oil cake, so make sure you use a good quality (and fresh, yes, EVOO can expire) olive oil.
- All-Purpose Flour – No fancy flour required, but if you want an extra tender cake you can also use cake flour.
- Baking Powder & Soda – This cake uses some acidic ingredients like buttermilk and lemon, so baking soda is needed to balance it out and give lift to the cake.
- Eggs – Eggs are a key component and give a rich taste. Make sure they’re at room temperature as they incorporate better with other ingredients.
- Buttermilk & Condensed Milk – The buttermilk gives a nice tang to the cake, while the condensed milk adds a malty-flavor and sweetness.
- Honey – I like to use Clover Honey for a spring floral taste, but feel free to experiment as different honeys have different tastes.
- Lemon juice & zest – To boost the tangy flavor of the buttermilk.
- Heavy Cream – Optional, but needed for stacking into a tiered cake.
equipment:
Six (6) inch cake pan – If you have 2, it makes the baking process faster, but I only have one, so I baked the cakes one after the other.
Stand-mixer or Hand held – For whipping cake batter, but also can be done by hand!
How to make olive oil cake
This method is called the dry and wet method. Commonly used for cupcakes and cakes. It ensures that the ingredients are well combined and the cake bakes out moist and lofty.
1. Prep the baking pans – Unlike other cakes, rather than greasing the baking pans with butter, grease the sides with olive oil, and cover the bottom of the cake pans with parchment paper rounds cut to size.
2. Combine all dry ingredients – I found that by sifting the flour beforehand the cake was much more soft.
3. Combine all the liquids – The buttermilk, condensed milk, vanilla, and honey gets whisked into a small mixing cup.
4. Beat the eggs and olive oil- By beating in the eggs one by one, the egg whites become aerated. This makes the olive oil cake tall and less dense. Make sure you add the olive oil slowly while the beating the batter, so it full combines with the eggs.
5. Alternate between adding dry and wet ingredients – This is the most important step. By adding the dry ingredients in batches it prevents the batter from seizing and lowers the chance of over mixing. Add the dry ingredients first, then a bit of the liquids, then dry again. Repeat this until you’ve used all the dry and wet ingredients.
6. Bake – Divide the batter in half into 2 baking pans or bake one at a time if you only have one pan.
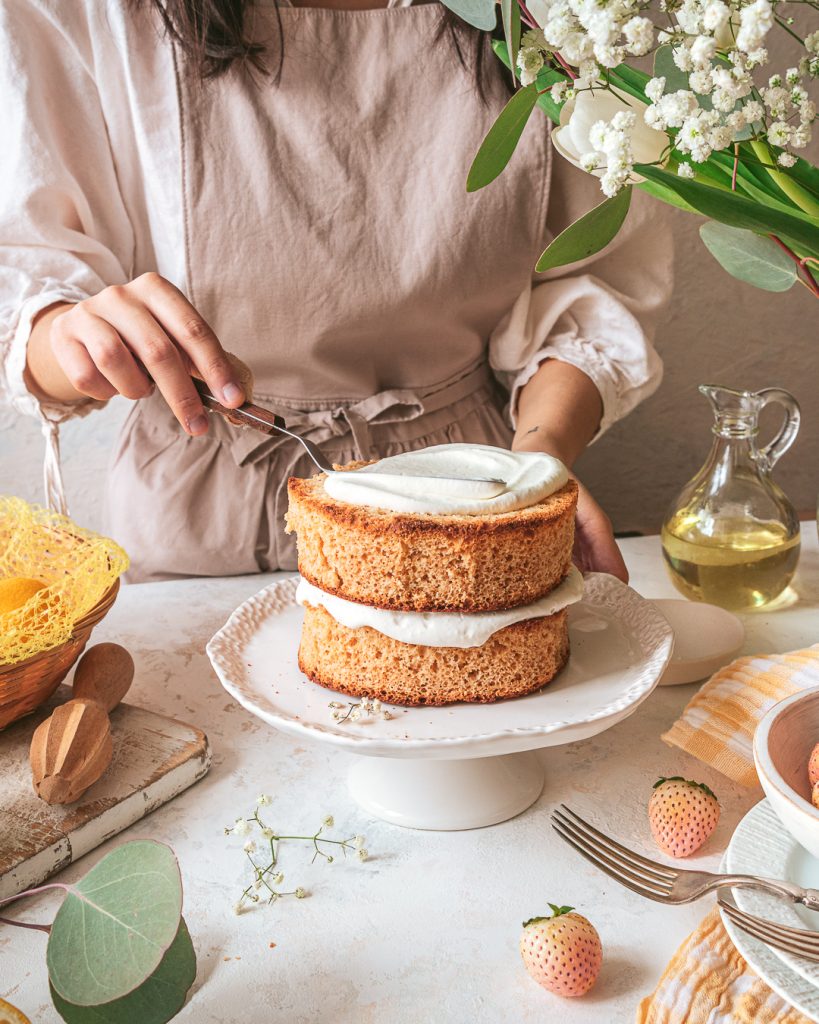
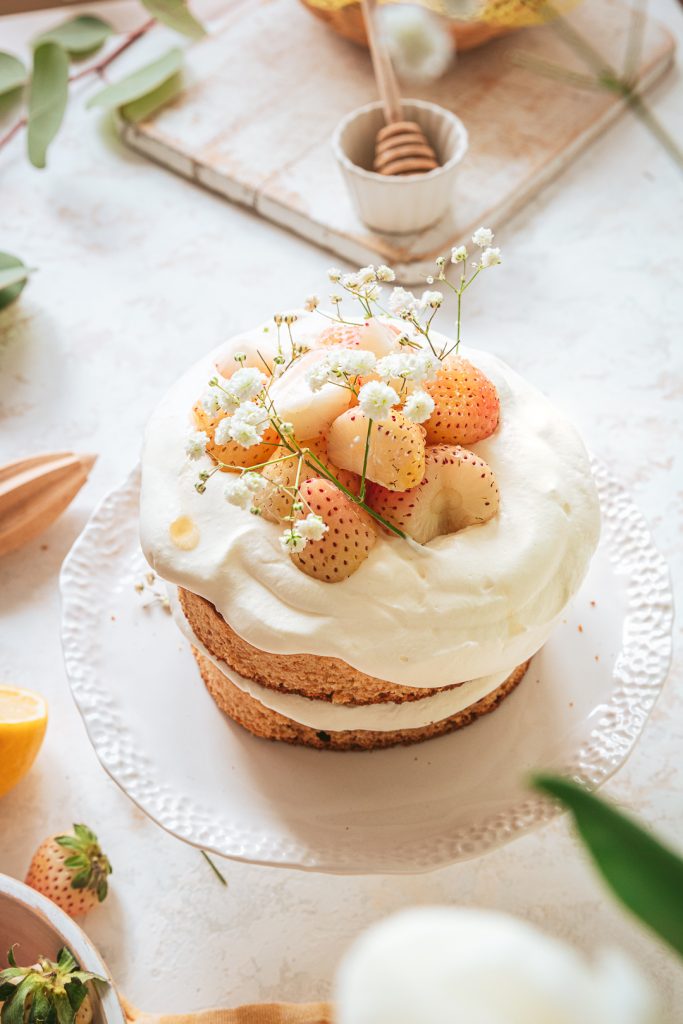
6. Decorate – Once the cakes are all cooled, carefully level-off the tops of the cake with a serrated knife. Whip up the heavy cream and assemble the full cake. Drizzle with lots of honey to serve. ENJOY!

Tips for making olive oil cake
TIP #1 – Prep everything! Use a scale to ensure the ingredients are accurate.
Tip #2 – Pre-whisk the condensed milk. Condensed milk is very thick, so to help it incorporate better, whisk it WITH buttermilk. To help it be even more liquid-like. Give it a thorough whisk when you open the can.
Tip #3 – Fold until just combined – Be careful not to over develop the gluten in the flour when mixing the batter. Mix just until there are no visible streaks of flour remaining.
TIP #4 – Olive oil cakes have a tendency to brown easily in the oven, so 15 minutes before they’re done, cover the tops with aluminum foil.
TIP #5 – Check with a toothpick – Be careful not to over-bake. The cake should be a light caramel brown. When you check for doneness, don’t worry if there are a few crumbs still clinging to the knife or skewer, as the cake will finish baking while it cools.
How to store olive oil cake
This Milk and Honey Olive Oil Cake stays fresh for up to 3 days when covered tightly with cling wrap or aluminum foil, then placed in an air tight container. Unfortunately, this cake is best made fresh, so I would not recommend making the batter the night before. The flour will absorb all the moisture and the cake will bake out dense.
I hope you enjoy this spring favourite! There are so many delicious variations of olive oil cake, I hope you give them all a try!
Happy Baking! Sharon
Make sure to tag me on Instagram @whiskfullyso and leave a review below if you made this recipe. I hope you loved it! For more delicious ideas follow me on Pinterest.

Milk and Honey Olive Oil Cake
Ingredients
for the cake batter
- 2 cups (255g) all-purpose flour
- 1.5 tsp (5g) baking powder
- ½ tsp (2g) baking soda
- 1 tsp kosher salt
- ½ cup (120ml) buttermilk
- ½ (120ml) condensed milk pre-whisk to be less dense
- ¾ cup (180ml) honey
- 2 tbsp (30ml) fresh lemon juice
- ½ tsp (5ml) vanilla extract
- 3 large eggs at room temperature
- ⅓ cup (67g) granulated sugar
- 1 tbsp freshly grate lemon zest
- ¾ cup (177ml) extra-virgin olive oil
to decorate
- 1 cup (250ml) heavy whipping cream
- 1 cup berries (optional)
- 1 tbsp (15ml) honey
Instructions
- Pre-heat oven to 350°F and grease two 6-inch round cake pans, with olive oil, then line the bottom with parchment paper cut to size.
- Sift flour, baking powder, baking soda, and salt into a large bowl. Whisk together the buttermilk, condensed milk (This will prevent the cake from being dense due to the thick condensed milk), honey, lemon juice, and vanilla extract in a cup.
- In the bowl of a stand mixer set to medium speed, beat in the eggs one-by-one until foamy, then add granulated sugar, and lemon zest. Beat until very fluffy, and pale yellow, approximately 2-3 minutes. With the mixer running on low speed, drizzle in the olive oil, and beat until fully incorporated.
- Lower the stand mixer speed to the slowest setting, and pour in a third of the flour mixture, then a third of the milk mixture, mixing until just combined. Then add flour, then milk, alternating between the two until both are just combined. Make sure you don't over mix the batter or the cake won't be fluffy. Scrape down the bowl as needed.
- Transfer the batter to the prepared pans, and smooth the tops using an offset spatula. Lightly tap the cake pans onto your work surface to remove air bubbles. Lastly, sprinkle the tops with about 2 tablespoons sugar.
- Bake the cake until a skewer inserted into the center comes out clean, about 35 to 40 minutes, and is golden brown. Transfer to a rack to cool for 20 minutes, then run a knife around the edge to release the sides of the cake from the pan. Invert the cake onto a plate and then flip it back over onto the rack to cool completely. Store leftovers in an airtight container at room temperature for up to one week.
- Just before serving, whip the cream with a drizzle or two of honey, to taste (up to 2 tablespoons if you like it sweet). Frost the top of one cake, top with the remaining cake then frost the top of the stacked cake. Drizzle with additional honey and garnish with berries, if you like.
Notes
- Store the cake or any leftovers in an airtight container at room temperature for up to one week.
- The cake can be made up to one day before. Make the whipped cream and assemble right before serving.


This was absolutely delicious. Such a lovely, complex flavor. I added a bit of strawberry instant pudding powder to the whipped cream to stabilize it, and sprinkled some bee pollen on top. I can’t wait to have another slice tomorrow.
oh my goodness! I love your additions! the strawberry pudding powder sounds so delicious, I hope you took a photo, because I would love to see it!
P.S so sorry for the late reply, but thank you so much for making the recipe!
I just came here to make this cake again, and saw your reply a year and a half later. I posted pictures on reddit: https://www.reddit.com/r/52weeksofbaking/comments/t22v8l/week_9_unusual_ingredients_milk_honey_olive_oil/
I’m not good at decorating, but this was one of the prettiest cakes I’ve ever made.
Used sugar-free cheesecake in the whipped cream this time, and still great.
Hi! Your cake looks beautiful! I love the strawberry addition and the piped flowers!
Lovely flavours and easy to follow recipe! Will make it again!