


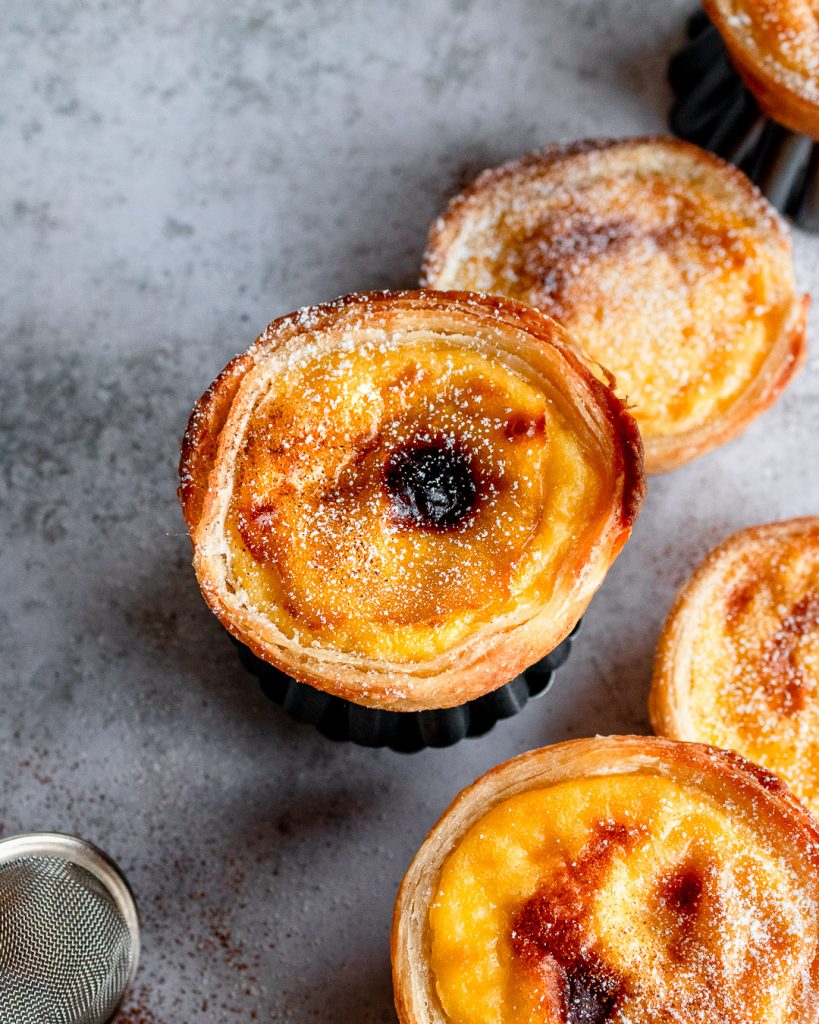
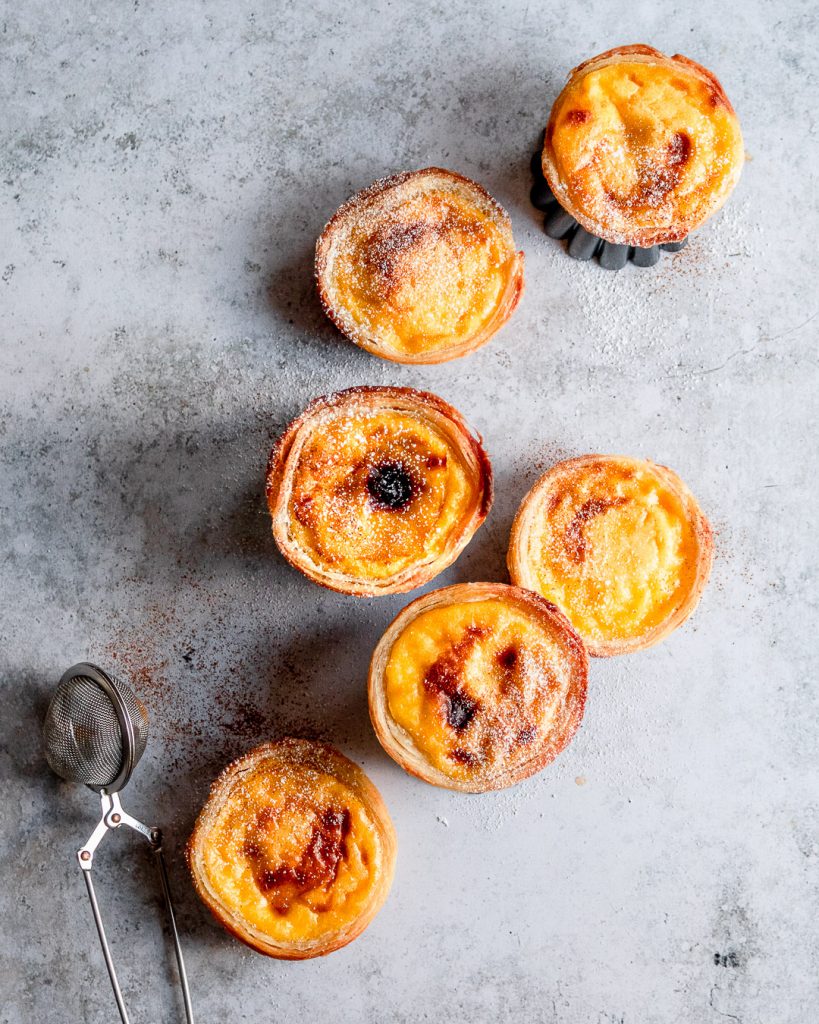
Creamy custard goodness with bubbles of caramelized sugar, wrapped in a flaky laminated puff pastry with the famous swirled bottom. That is the deliciousness that is Pastéis de Nata (Portuguese Egg Tarts). You won’t be able to resist this Portugese classic!
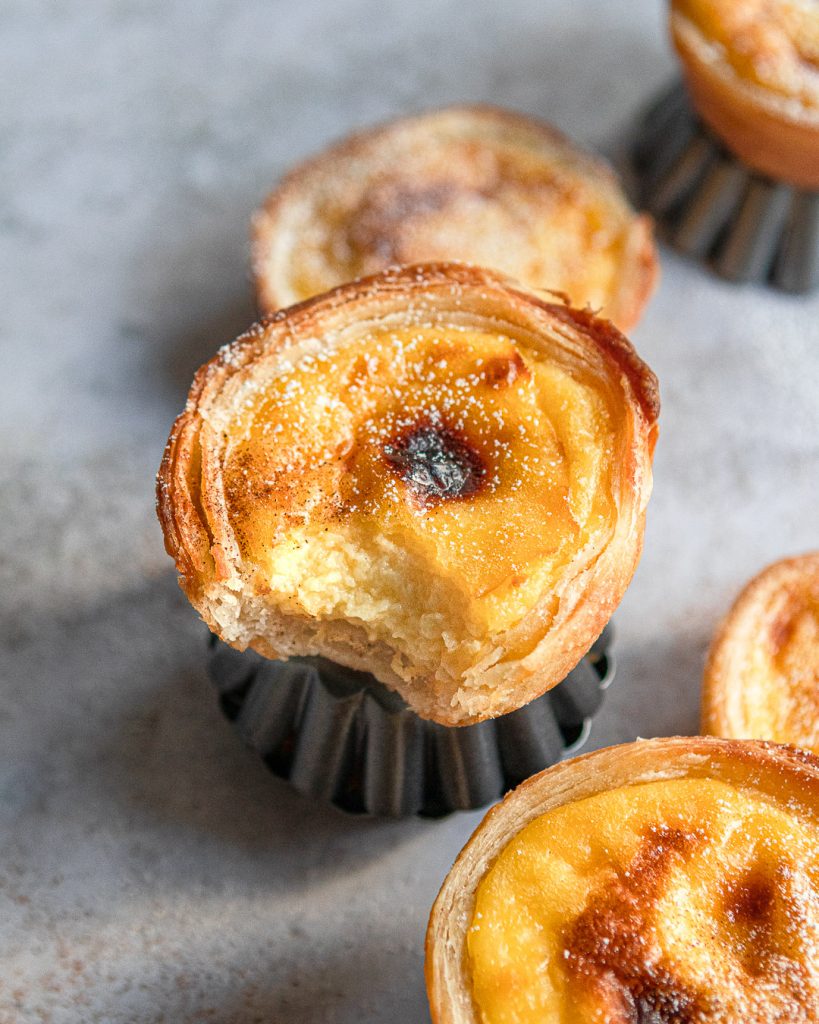
My first experience with this creamy custard tart delight was in Portugal. There you’ll find only THE BEST, and rightly so, they’re the creators of this treat. While this might seem like an evening dessert, these are actually best enjoyed in the morning (piping hot, the custard should be bubbling) with a hot cup of coffee. Don’t be THAT person who eats the custard with a spoon, then the crust. To get the full experience, take a large bite of both custard and crust. You’ll hear heavenly choirs singing.
What is Pastéis De Nata? What is a Portuguese Egg Tart?u
Pastéis de Nata (pronounced Pa-shhh-te-shhh de Naata) is better known as Portuguese Egg Tarts (not to be confused with Hong Kong Style Egg tarts) and is the epitome of all things good and flaky, so of course I had to make it!
Unlike other laminated pastries (this means that butter is added to the dough, and the dough is folded a series of time to get flaky layers), this recipe doesn’t take more than a day. WHEW! If you’re new to laminating doughs, I think this is the perfect recipe to start with since the butter is smeared on top of the dough – like spreading the filling in cinnamon buns. You don’t have to worry about butter blocks and all that. The custard filling is made by first creating a sugar syrup with spices and lemon, which is then added into a simple custard of egg yolks, milk, some flour and eggs. I break down each step below so keep reading!
Ingredients for Pastéis de Nata
NOTE: If it’s too intimidating to make the puff pastry yourself or you’re short on time, you can always go with the store bought route. HOWEVER, after trying both, I 100% believe that made from scratch is more flaky and tastes better.
All-Purpose Flour: No fancy pastry flour required, but since this recipe is in grams, make sure you weigh your flour correctly. Fluff, spoon into the measuring cup, and level off!
Water: This is what will bind the dough together. This dough is quite wet at the start, but don’t worry it will come together!
Unsalted Butter: The star of any flaky amazing pastry is the butter! This is the time to use that fancy butter because all the flavours will come out! Make sure you give ample time for the butter to come to room temp. It should be squishy soft, but not melted!
Cinnamon, Cardamon, Clove, Lemon: These are imperative for the custard! Without it, it wouldn’t taste the same.
Granulated Sugar: The primary sweetener in this recipe! You’ll only need it for the sugar syrup.
Whole Milk: I haven’t tried making this recipe with plant based milks, but you’re welcome to give it a go! It will, however, change the taste of the custard.
Egg Yolks: This is the heart of the custard, eggs add richness and fat, so it’s crucial that you use the amount of eggs listed. Let your eggs come to room temperature before separating as it will be easier!
*not sure what to do with the egg whites? Make a meringue or better yet, Macarons!

How to Make Pastéis De Nata & The Custard Filling
NOTE: I mention this above, but if you don’t want to make the pastry yourself you can use a store bought puff pastry, and start from the last step of the pastry folding (aka the rollling stage)
1.Make the Dough: Combine flour, salt and water in a bowl, and mix it together. Knead it slightly (either by hand or in a stand mixer with a dough hook) until it is a shaggy and sticky. Let it relax on a slightly floured surface, beneath a bowl. DO NOT WRAP OR COVER WITH CLOTH IT WILL STICK!
2. Roll it Out: On well-floured surface, roll the dough into a 10 x 10 inch square. Make sure the dough doesn’t tear, it will be quite thin. Spread a third of the butter onto 2/3 of the square, then fold into thirds (like a brochure). Rotate the dough 90 degrees, and then roll it out into a square and spreading the 2nd third of butter. Repeat the 90 degree turn and roll, before smearing the last third of butter onto the entire surface leaving on 1 inch uncovered at the top.
TIP: If the dough is sticking to the surface, re-sprinkle flour and use a bench scraper to pick up the edges.
3. Roll into a log: Moisten your fingertips with water, and brush the uncovered 1 inch with water. From the end closest to you, start rolling the dough square into a log. Use your palms to coax the dough into a roll. At the very end, press the edge into the log gently to seal. Wrap the entire log in plastic and refrigerate for at least 2 hours (best overnight).
4. Make the Sugar Syrup: Whisk all the sugar syrup ingredients in a small pot and heat until simmering on low heat. Once the sugar is dissolved, let it cool for 30 minutes. Once cool, strain out into a cup.
5. Make the Roux: Combine flour, a third of the milk, and whisk together until thick and there are no lumps. This is a roux which will help thicken the custard. Heat the rest of the milk in a pot over medium-low heat until just simmering (do not boil). Add in the roux mixture, and whisk vigorously for 3-5 minutes until it thick, gooey and creamy. It should fall off in ribbons.
6. Add in Egg Yolks to finish the Custard: Add in the cooled sugar syrup and vanilla extract. Whisk until slightly cool, then add in the 4 large egg yolks and whisk until the custard is smooth. Whisk quickly to prevent the eggs from cooking! Strain the custard and discard any un-strainable liquids. Chill in the fridge covered with cling wrap until ready to use.
7. Slice and Press Pastry Cups: Remove the dough from the fridge and place on a lightly floured surface. Trim off the edges of the roll, then cut into 6-7 even pieces. Each should be at 3/4 inches thick. You should be able to see a tight swirl on the side once cut!
8. Assemble Crust: Place each cut round into the center of a cupcake tin, and using wet thumbs, lightly press down into the center of the round. Press the dough from the center out – covering first the bottom of the tin, then the sides. Continue pressing until the crust is 1/4 inch thick all around and is 1/4 inch above the lip of the cup. Repeat until all the rounds have been pressed. Freeze for 5-10 minutes until hardened. This prevents the cups from shrinking too much.
9. Fill & Bake: Preheat your oven to 500° – 520°F (depending on your oven’s max temp). Pre-heat a baking tray in the oven that can fit the cupcake tin. Fill each pastry cup 3/4 way with the custard mixture. (Don’t fill all the way or it will overflow when baking). Place the muffin tin on the preheat baking sheet and baking for 9-12 minutes depending on the temperature or until the pastry is golden brown; the custard is puffed, jiggly, and has round charred bubbles.
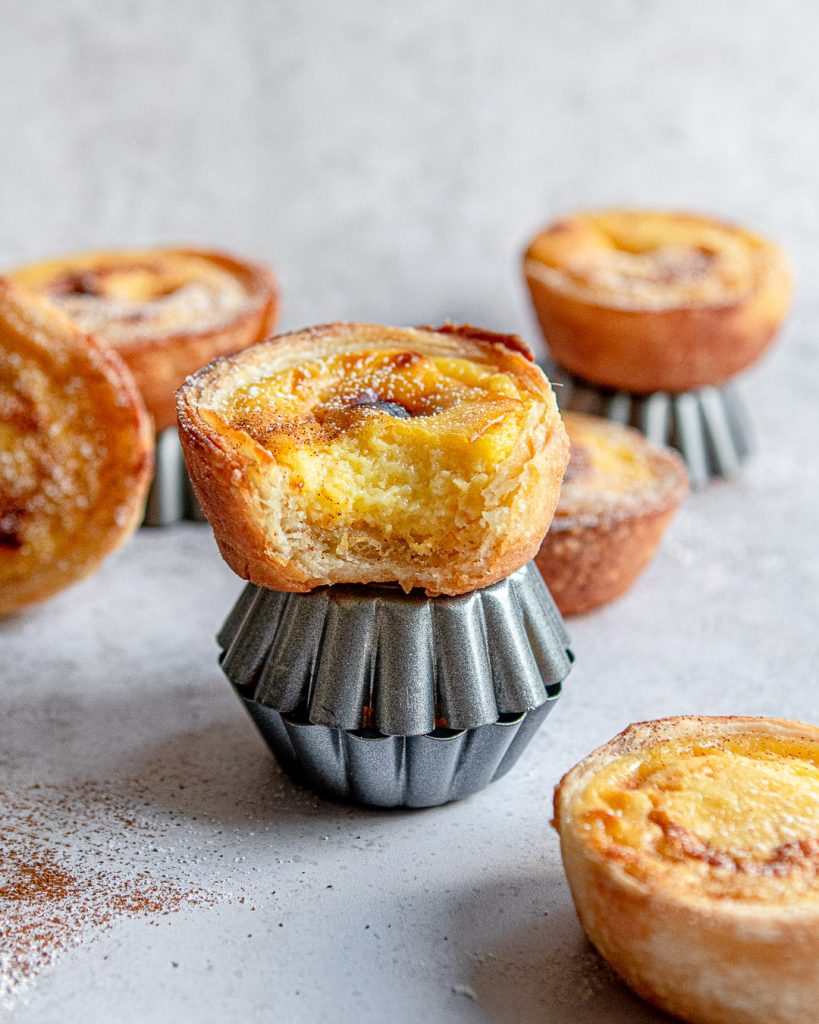
10. ENJOY! Let the portugese egg tarts cool for 5-10 minutes before removing from the tin! They taste best hot with a sprinkle of confectioners/powdered sugar.
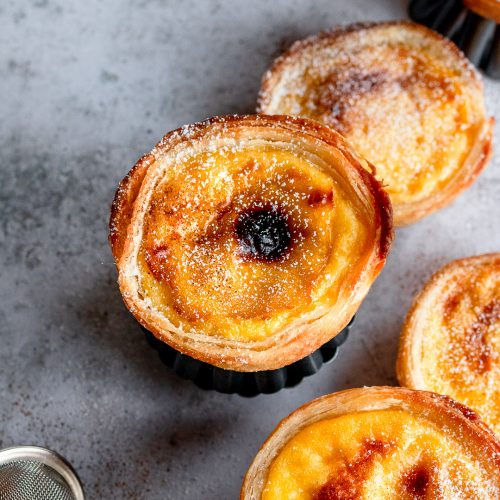
How Do I know I made the Portuguese Egg tarts correctly?
Here’s what to look for in a perfect Pastéis de Nata:
A perfect Pastéis de Nata or Portuguese egg tart has a characteristic char. Not a blackened char, but if you baked them at the correct temperature the custard will have bubbles of caramelized egg.
A tell-tale difference between these egg tarts and other recipes is the swirl on the bottom of the pastry. If you folded the dough correctly, you should see that swirl. It’s not imperative for the taste…but it does mean your pastry is extra flaky – as it should be.
It should jiggle. You’re not looking for the custard to be perfectly baked and set, but (like softly scrambled eggs) it should be creamy and slightly oozy when you bite into it.
How to store Portuguese Egg Tarts
Store these in an air-tight container or on a plate wrapped tight with cling wrap. There’s no need to refrigerate them. These will remain fresh for 3 days (if they last that long :P)
When ready to enjoy, warm in a preheat oven at 350°F for 3-5 minutes.
Can I Make Portuguese Egg Tarts in Parts?
Absolutely! The pastry dough is best when it is chill overnight. The custard can be made up to 2 days ahead as long as it’s stored in the fridge. The dough (and custard) can be made the night before, and assembled and baked the next day.
There you have it! Homemade Portuguese eggs tarts, just like the real thing from Portugal! I
Happy Baking!
Sharon
Flaky Homemade Pastéis De Nate (Portuguese Egg Tarts)
Ingredients
for the dough
- 150 g all-purpose flour
- 1/2 tsp salt
- 100 ml water room temperature
- 113 g unsalted butter room temperature, very soft
for the sugar syrup
- 1 small stick of cinnamon
- peel from 1/2 a small lemon scrubbed clean to remove wax layer
- 3 small cardamom pods crushed
- 1 clove
- 100g granulated sugar
- 75ml water
for the custard
- 40g all-purpose flour
- 1 cup milk room temperature
- 1/2 tsp vanilla extract
- 4 egg yolks room temperature
Instructions
for the dough
- Combine flour, salt and water in a bowl, and mix it together. Knead it slightly (either by hand or in a stand mixer with a dough hook) until it is shaggy and sticky. Let it relax on a lightly floured surface, beneath a bowl for 15 minutes. Do not wrap or cover with a cloth.
- On a well-floured surface, roll the dough into a 10 x 10 inch square, making sure the dough doesn't tear, it will be quite thin. Spread a third of the softened butter onto 2/3 of the square, then fold into thirds (like a brochure). Rotate the dough 90 degrees, and then roll it out into a 10 x 10 inch square again and spread the 2nd third of butter. Repeat the 90 degree turn and roll, before smearing the last third of butter onto the entire surface leaving on 1 inch uncovered at the top.
- TIP: Make sure the butter is spread in a smooth layer without clumps or the dough could tear while rolling. Better to spread less than too much.
- TIP: If the dough has become too soft or the butter is melting, place in the freezer for 5 minutes in between any of the folds.
- Moisten your fingertips with water, and brush the uncovered 1 inch with water. Starting from the end closest to you, start rolling the dough square into a log. Use your palms to coax the dough into a roll. At the very end, press the edge into the log gently to seal. Wrap the entire log in plastic and refrigerate for at least 2 hours (best overnight).
for the sugar syrup
- Whisk all the sugar syrup ingredients in a small pot and heat until simmering on low heat. Once the sugar is dissolved, let it cool and develop flavour for 30 minutes. Once cool, strain out into a cup.
for the custard
- Combine flour, a third of the milk, and whisk together until thick and there are no lumps. This is a roux which will help thicken the custard. Heat the rest of the milk in a pot over medium-low heat until just simmering (do not boil). Add in the roux mixture, and whisk vigorously for 3-5 minutes until it is thick, gooey and creamy. It should fall off in ribbons.
- Add in the cooled sugar syrup and 1/2 tsp of vanilla extract. Whisk until slightly cool, then add in the 4 large egg yolks and whisk vigorously to prevent the eggs from cooking and until the custard is smooth. Strain the custard and discard any un-strainable liquids. Chill in the fridge covered with cling wrap until ready to use.
to assemble
- Remove the dough from the fridge and place on a lightly floured surface. Trim off the edges of the roll, then cut into 6-7 even pieces. Each should be at 3/4 inches thick. You should be able to see a tight swirl on the side once cut!
- Place each cut round into the center of a cupcake tin (there's no need to butter the tin, as the pastry has tons of it), and using wet thumbs, lightly press down into the center of the round. Press the dough from the center out - covering first the bottom of the tin, then the sides. Continue pressing until the crust is 1/4 inch thick all around and is 1/4 inch above the lip of the cup. Repeat until all the rounds have been pressed. Freeze for 5-10 minutes until hardened. This prevents the cups from shrinking too much while baking.
- Preheat your oven to 500° - 520°F (depending on your oven's max temp). Preheat a baking tray in the oven that can fit the cupcake tin. Fill each pastry cup 3/4 way with the custard mixture. (Don't fill all the way or it will overflow when baking). Place the muffin tin on the preheat baking sheet and bake for 9-12 minutes, depending on the temperature, or until the pastry is golden brown; the custard is puffed, jiggly, and has round charred bubbles.
- Let cool for 5-10 minutes before removing from the tin! They taste best hot with a sprinkle of confectioners/powdered sugar.


Read the Comments +