


Pâte Sucrée produces the most perfectly golden and crumbly tart dough, best of all it comes together in just 30 minutes (not including chill time)! Perfect for making ahead of time and stashing in your freezer for when you’re ready to use! I understand pastry can be intimidating, but this recipes requires no fancy equipment. All you need are your hands! To make this easier, I’ve included step-by-step photos for you to follow along.
In need of baking inspiration for this recipe? what about a tart Blood Orange Meringue Tart? or a comforting Spinach Prosciutto Quiche?
*NOTE: Normally, I give both imperial measurements (cups, tsp, etc.) and metrics (grams) for my recipes; however, in pastry each measurement makes a difference, so I will only be providing metrics here (grams).
what is Pâte sucrée?
Every baker needs a Pâte Sucrée recipe in their back pocket as it is one of the core pastry recipes. In total, there are 3 core recipes each with their own purpose: 1) Pâte Brisée; 2) Pâte Sablée; and 3) Pâte Sucrée.
Pâte Sucrée has the highest sugar and egg content making it the sweetest and most rich out of all the doughs. For this reason, Pâte Sucrée is best paired with lighter flavors such as fruit or chocolate. I use this recipe so much, especially in the summer when making fruit tarts and the creaming method is used to create the crumbly texture (see step-by-step photos below).

All the details in this Pâte sucrée recipe
YIELD: This recipe makes enough dough for one (single layered) 8 inch or 9 inch tart.
TEXTURE: This dough is the lightest and most crumbly (not to be confused with gritty..ewww no). The final crust is delicate and melts in your mouth when you bite in. The higher content of eggs and sugar gives it a golden color as a result of the sugar caramelizing.
FLAVOR: This recipe contains 40% fat giving it quite a rich buttery taste. For optimal results and texture, I would stay between a fat range of 40%-50%.
LEVEL OF DIFFICULTY: Extremely easy! This pie dough comes together very quickly. Unlike American Pie doughs, this recipe does not need water or alcohol to make it easier to roll out, so there is less guess work involved.
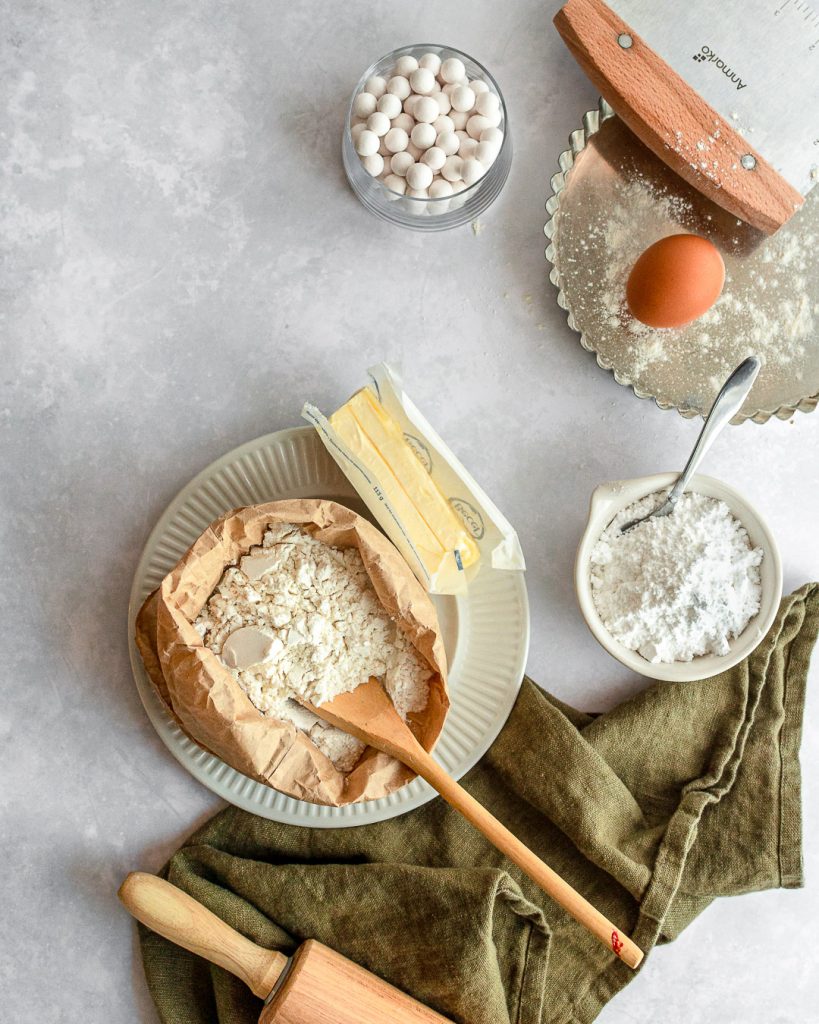
Ingredients for pâte sucrée
All you need is 4 simple ingredients for buttery perfection!
Unsalted Butter: Use the good stuff as you want the best possible butter taste. Both vegan and dairy butter work for this recipe. Take out your butter the night before so it can soften to room temperature.
Powdered Sugar: Do not substitute this for granulated. Powdered sugar dissolves more thoroughly giving a creamy smooth texture.
Egg: This gives richness to the crust and it is the only liquid needed.
All-Purpose flour: Nothing fancy needed here. You can experiment with other flours, but remember flours with more gluten need more liquid.
How to prevent a soggy bottom and other Pâte Sucrée tips
1.CHILL: This is THE MOST important rule when it comes to making pie dough. While the butter DOES NOT need to be cold for this recipe, it is crucial you chill the dough both times. Once after the dough is forms, and once more after the dough has been placed into the baking tin.
2. REST: The dough needs to rest so the gluten-strand do not over develop and become tough. The dough needs to rest in the fridge for a minimum of 30 minutes, but the longer the better.
3. Brush the base with egg wash: This step seals the top of the pie crust so when the filling is added it will not soggy-up the pie crust. 5 minutes before the pie crust is baked, remove from the oven and brush with egg wash (1 beaten egg yolk with 1 tsp water) before returning to the oven for the remainder of baking time.
How to make Pâte Sucrée
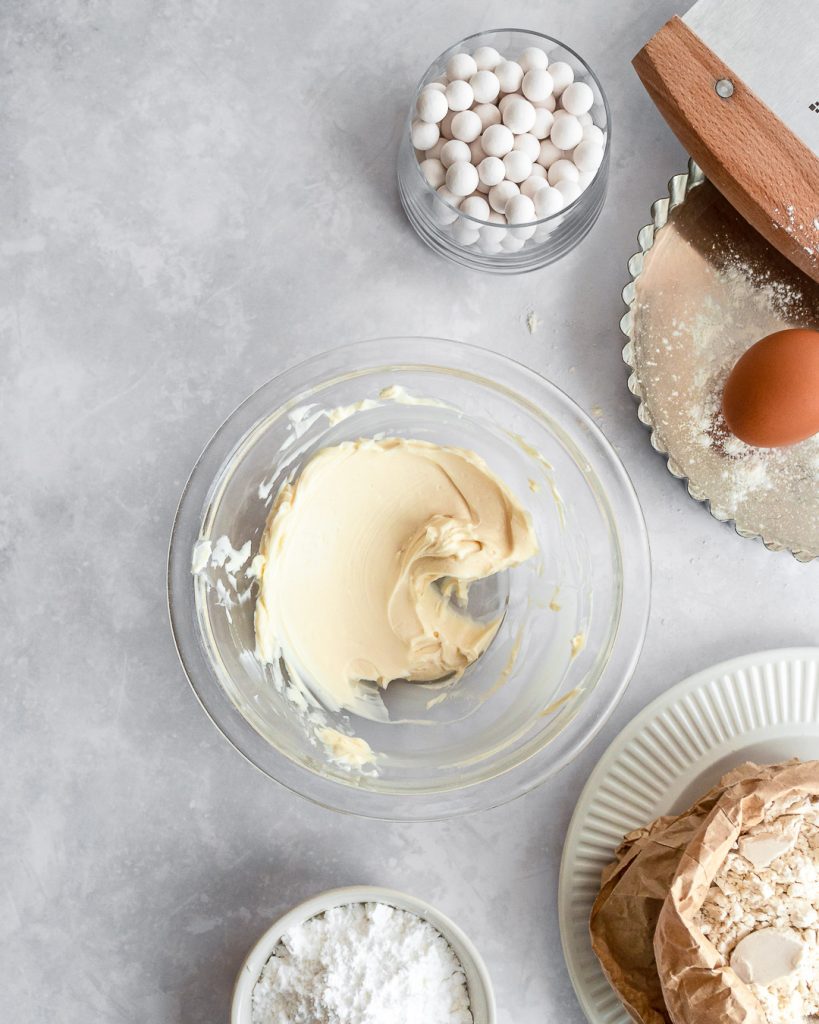
#1. Cream softened butter
If you’ve made pie dough before, you’re probably wondering, “why am I creaming the butter? And why is it warm?”
You’re right! Normally when making pie ALL the ingredients should be cold, but in this case creaming the softened butter gives a melt-in-your-mouth texture to the dough. Use a spatula to thoroughly smooth the butter.
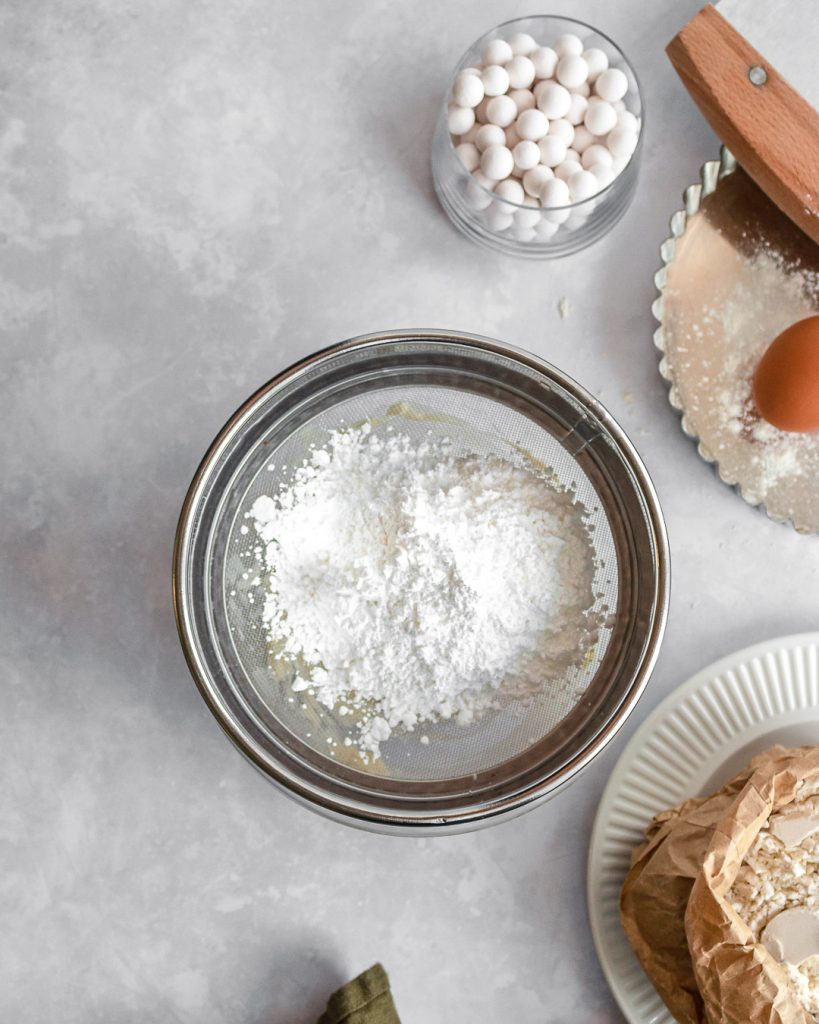
#2. Sift in powdered sugar
Always sift in powdered sugar to prevents clumps and grittiness then combine the smooth butter with the powdered sugar. Use your spatula to really press the butter and sugar together until the sugar is dissolved and the mixture is completely smooth again.
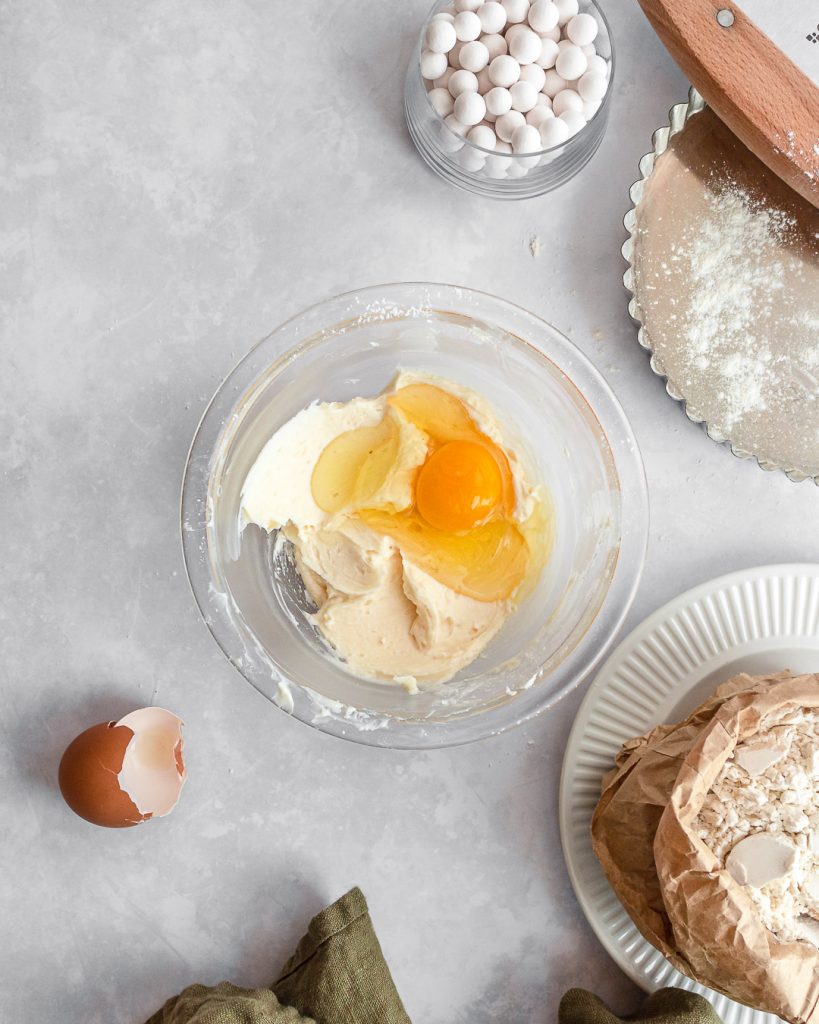
#3. Add the egg and mix until homogenous
This step requires a bit of patience. The egg white emulsifies the butter into little clumps, so keep mixing until most of the egg thoroughly mixes into the butter/sugar mixture.
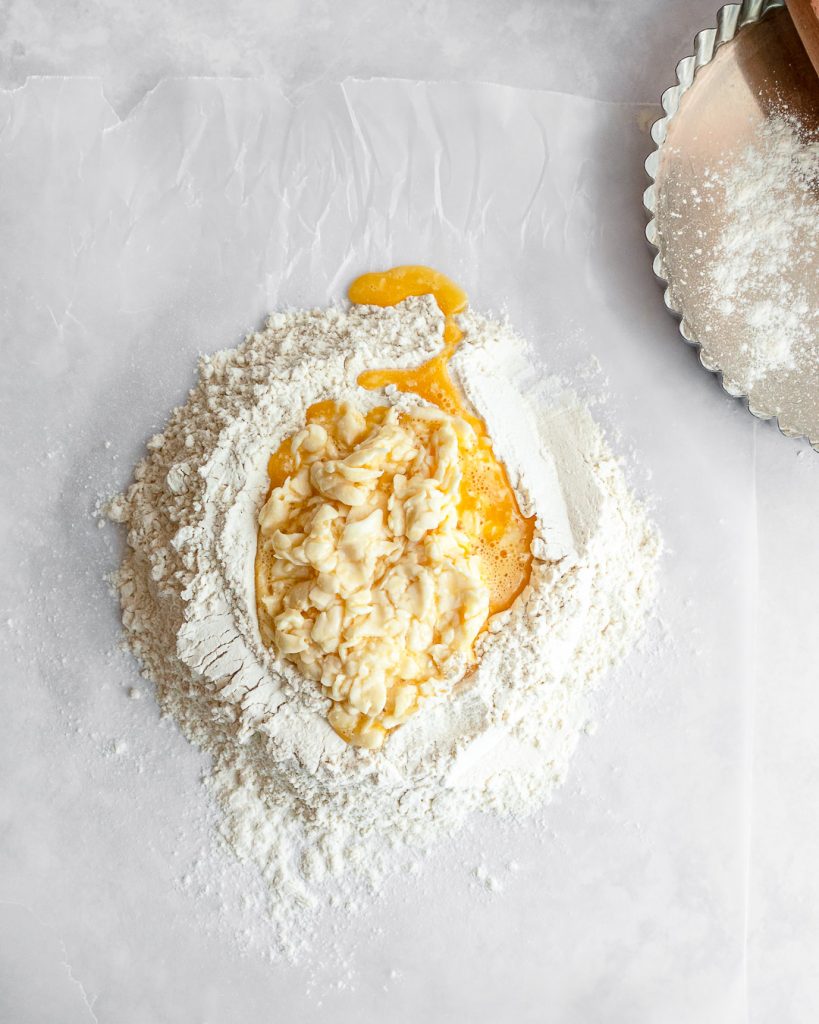
#4. Add egg mixture into flour
Once the butter mixture is fairly incorporated with the egg, make a well with the flour and pour the butter/sugar/egg into the middle.
#5. Add dry ingredients
As a bench scraper to gradually add flour with the wet ingredients. Always move from out to in to avoid the egg from spilling out.
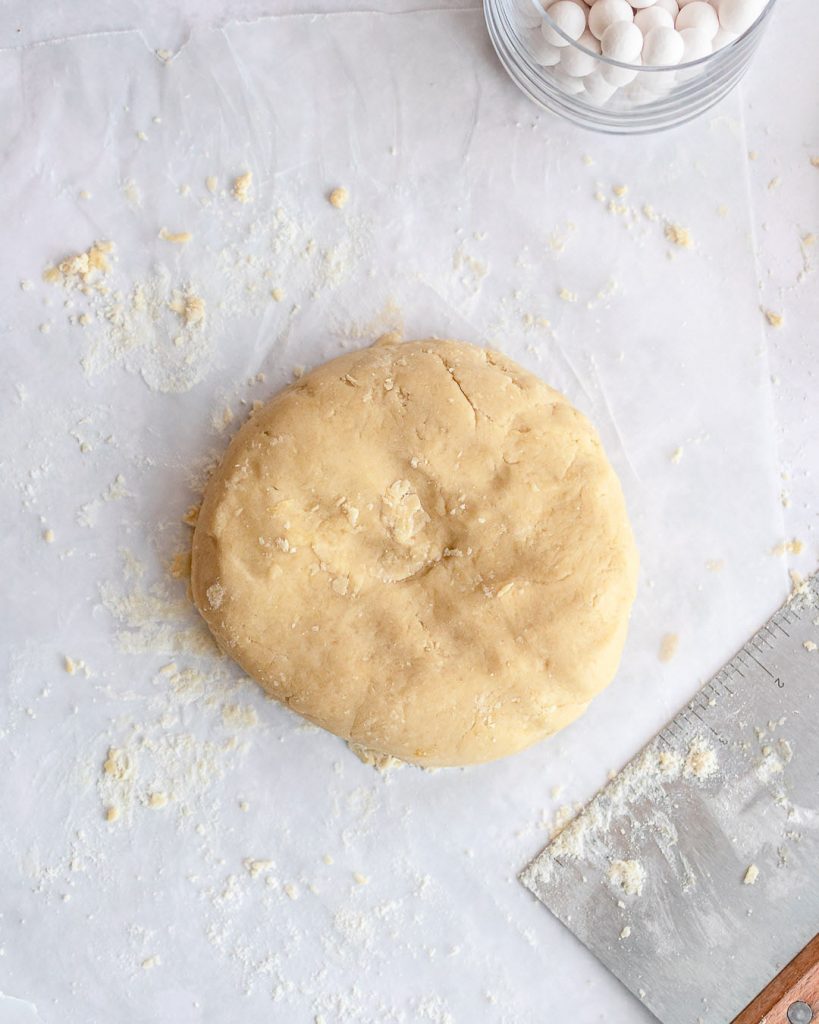
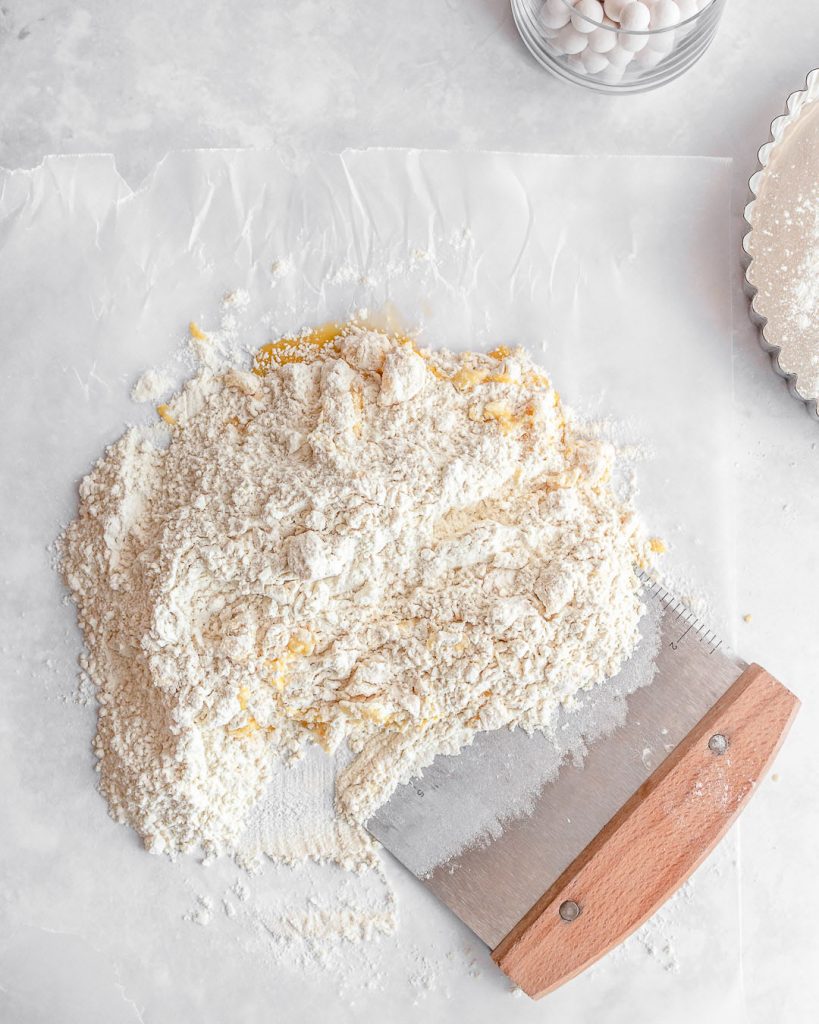
6. Shape dough into a 1 inch disc
Once all the wet ingredients are incorporated with the dry, the dough should be smooth, and slightly moist to the touch. If there are any dry patches, dribble droplets of water over the patch and knead until incorporated with the rest of the dough.
Form into a disc no thicker than 1.5 inches and chill in the fridge for a minimum of 30 minutes.
How to blind bake Pâte Sucrée
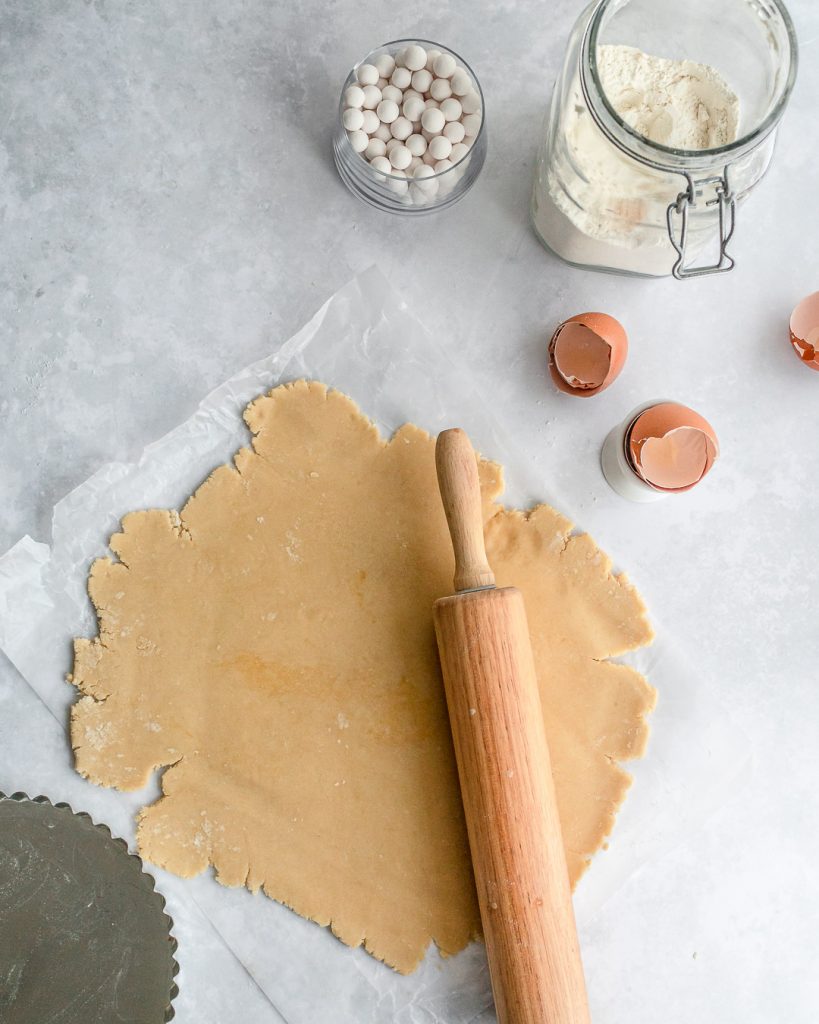
#1. Roll out the dough
Once the dough has been chilled, it is easier to roll out because the gluten strands have relaxed. Remove the dough from the fridge, and lightly flour your working surface. Dust flour the top of the dough disc and your rolling pin.
The dough will be hard right out of the fridge, so press it a few times with the rolling pin to soften. Roll out until it is 1/4 inch thick.
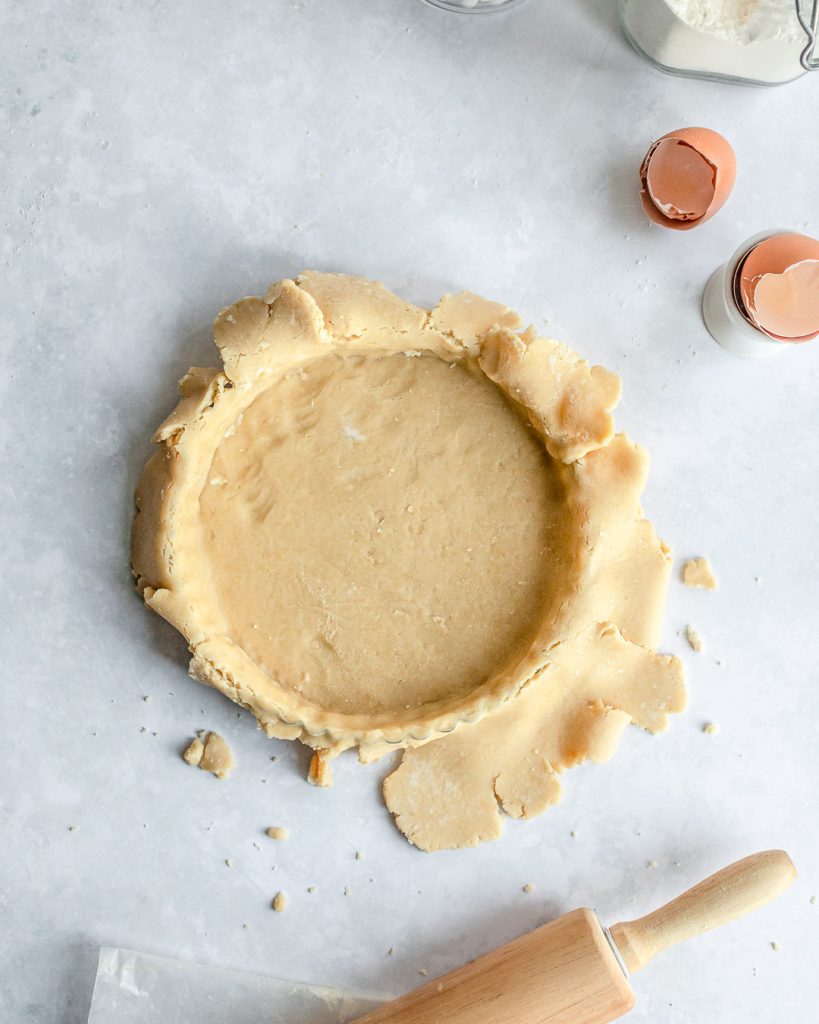
#2. transfer to tart pan
Butter your tart pan either with non-stick spray or softened butter. Transfer your dough to the pan by either : 1) Folding into quarters and unfolding over the pan; or 2) Place the rolling pin over the center of the dough dough, and fold half of the dough over and use the rolling pin to carry it to the pan.
#3. Fit the dough into the pan
To ensure the dough does not stretch and develop thin spots. Lift the edges of the dough with one hand and use the other to press the dough into the corners of the pan. Be gentle to avoid ripping the dough!
Use your index finger to lightly press the dough into the grooves of the pan. Take your time to ensure a neat and even thickness crust.
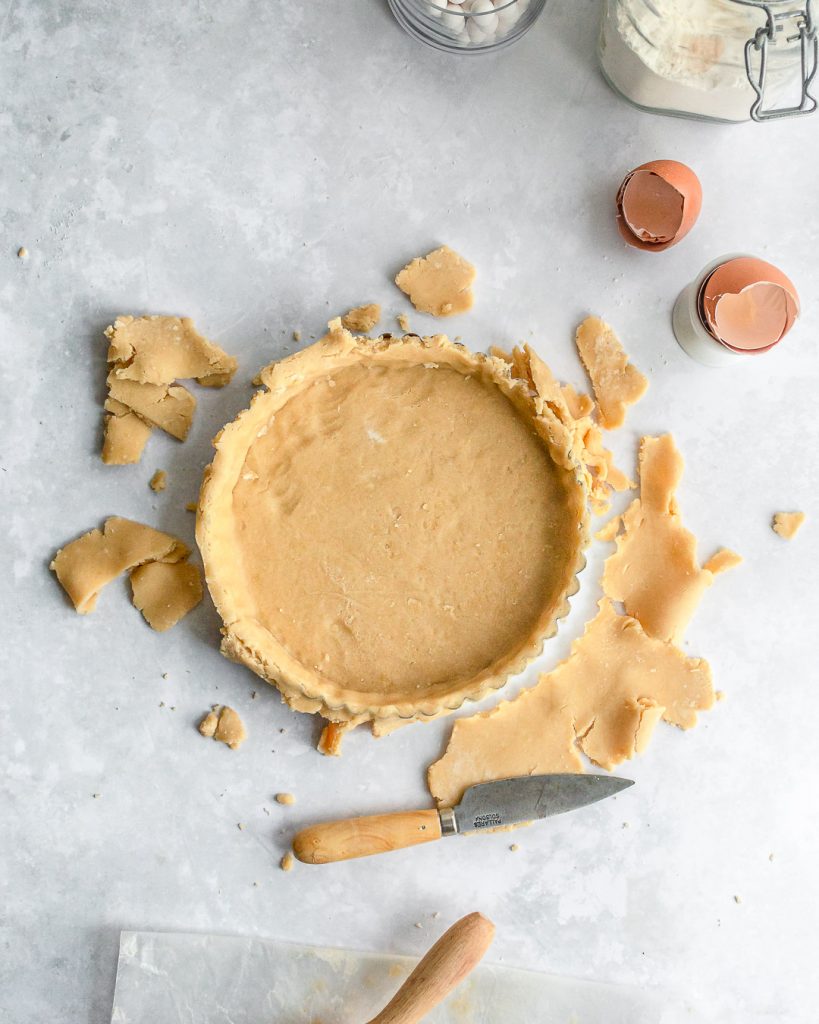
Trim off the excess with a sharp knife by holding the knife blade parallel to the table and making side-to-side cutting motions against the dough.
*Check to make sure the sides of the dough are of even thickness.

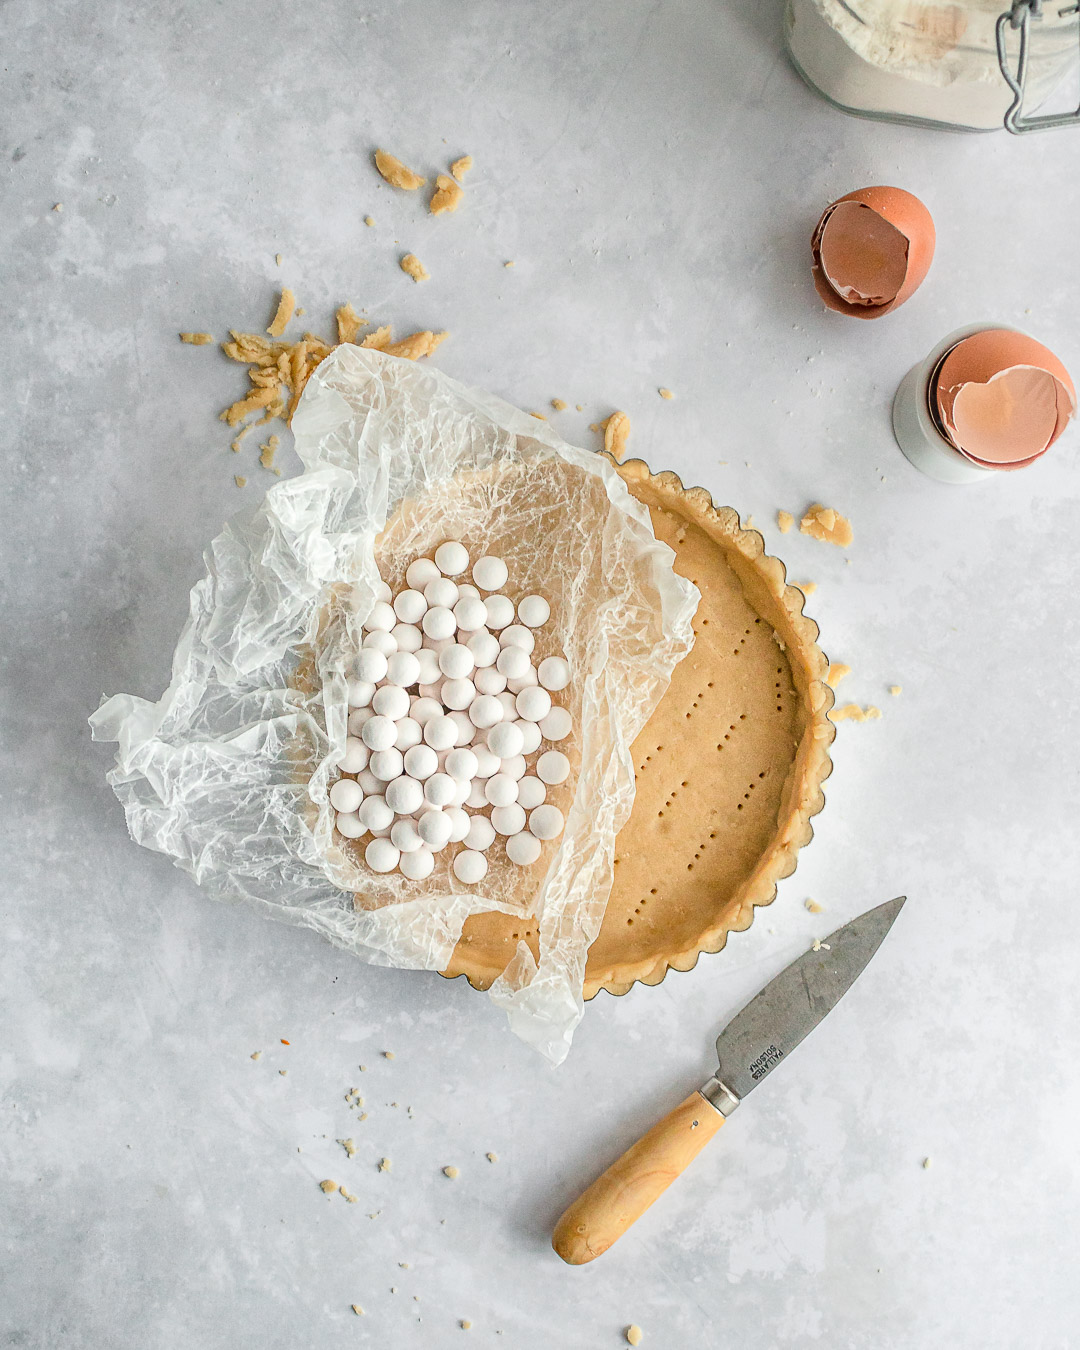
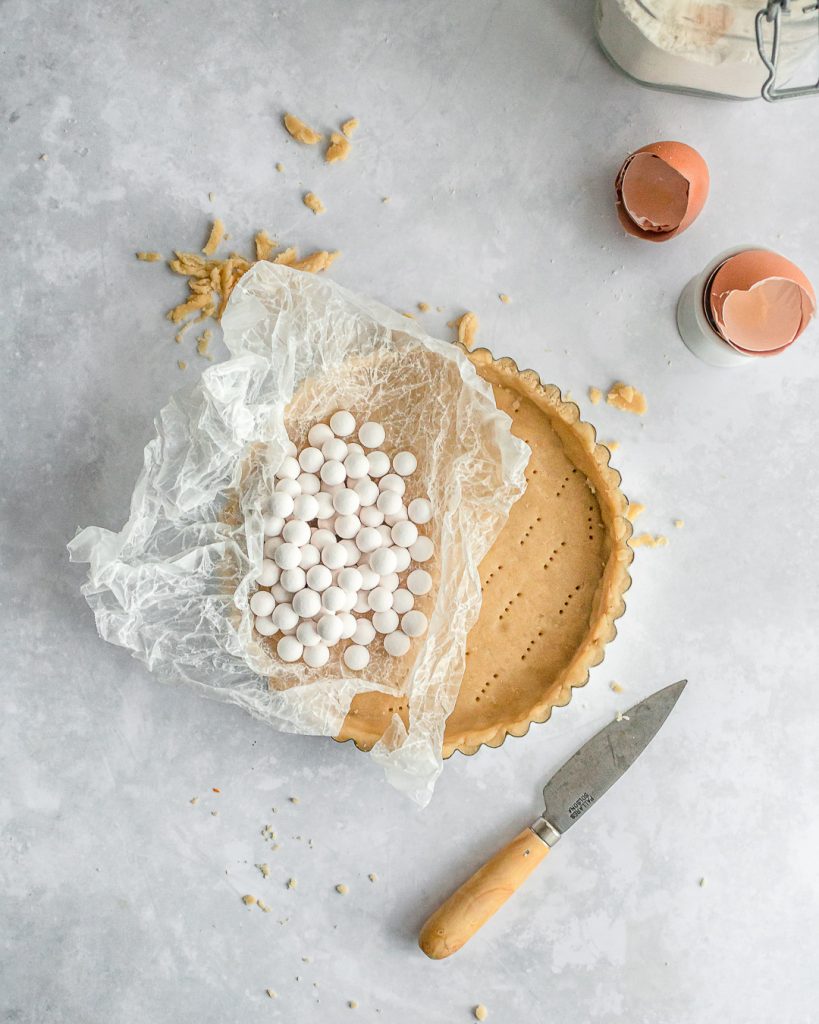
#4. Add pie weighs and chill once more
Now you’re ready to bake! First, lightly prick the base of the pie crust with a fork. Do not prick all the way through! This creates “vents’ for the steam to escape so the pie crust does not shrink or puff while baking.
Use grease-proof paper (essential so the paper does not tear the pie crust) to cover the entire pie crust and fill to the brim with pie weights. Alternatively, you can use dried beans or rice. These weights prevent the base of the dough to puff up while baking.
Chill once more in the freezer for 10 minutes to get a really flaky crust. *If a pie crust is warm and melty when baked the crust will be tough.
How to bake Pâte Sucrée
Here are two baking options: the one your use will depend on the recipe. For both preheat your oven to 180c/350°F.
Par Baked Pâte Sucrée
Par baked is just a fancy way of saying “half-baked” this is used when your pie needs to be further baked after the filling is added.
Bake the tart for 10-15 minutes until the pastry is firm, then lift out the grease-proof paper with the pie weights, and re-bake for 7 minutes until just turning golden. Let the tart cool slightly before adding your filling and baking once more at the recommended recipe time.
fully Baked Pâte Sucrée
This method is used when the tart does not need to be further baked. Used for cold fillings like creams and panna cottas.
Bake the tart for 10-15 minutes until the pastry is firm, then lift out the grease-proof paper with the pie weights, and re-bake for another 8-10 minutes or until the tart is golden.
This post is much longer than most, but I really wanted you to feel confident about making Pâte Sucrée. Once you’ve made it once or twice you’ll better understand the process and develop your flow! This recipe really is a classic and once you’ve mastered the flavors combinations are endless!
Happy Baking!
Sharon

30 Minute Pâte Sucrée Recipe
Ingredients
- 100 g unsalted butter softened
- 72 g powdered sugar
- 1 whole egg
- 210 g all-purpose flour
- 1/4 tsp kosher salt
for the egg wash
- 1 egg yolk whisked
- 1 tsp (5ml) milk or water cold
Instructions
for making the pie dough
- Cream the softened butter in a bowl with a spatula until fluffy and smooth.
- Sift in the icing sugar and beat until smooth and no streak of sugar remain.
- Add in the egg. At first the egg white will emulsify the butter until little clumps, so keep mixing until all the egg white is mixed into the butter and is homogenous.
- To add the dry ingredients, on your work surface place the flour in a mound and create a well in in the center. Add the wet butter/sugar/egg into the well and use a scraper to gradually add flour to the wet.
- Once the dough is moist, and holds together, form into a block, wrap in cling wrap and rest in the fridge for a minimum of 30 minutes, optimally 2-3 hours.
to blind bake
- Preheat the oven to 375°F and prep the tart pan, by greasing with non-stick spray or softened butter. Make sure all the grooves are greased for easy removal.
- On a lightly floured surface, roll out the chilled tart dough to 1/4 inch thick and place into the tart pan by lifting and easing the dough into the pan and its corners. Lightly press the dough into the sides of the pan especially if your pan has fluted/ridged sides. Use a sharp smooth knife and trim off the excess dough leaving a 1/4 inch allowance.
- Prick the bottom of the crust multiple times with a sharp fork then line the bottom with a removable disk of parchment paper cut into the same size. With your chosen pie weight, fill to the very top. Chill the assembled tart in the freezer for another 10 minutes or until ready to use.
for par baking
- Bake the crust for 10-15 minutes then remove parchment paper + beans and bake for another 5 minutes until the rim is just turning golden. Let the tart cool slightly before adding your filling and baking once more at the recommended recipe time.
for fully baked
- Bake the crust for 10-15 minutes then remove parchment paper + beans and bake for another 5 minutes. Remove and brush the bottom with egg wash (to prevent a soggy bottom) and bake for another 3-5 minutes or until the rim and bottom is golden.
Notes
- Dairy butter can be replaced with vegan butter.
- Other flours can be used but adjust egg amounts and add water if needed as certain flours need more liquid.
- The pie dough can be made ahead and stored in the freezer for up to 2 months. Defrost the night before in the fridge before using.
- The pie crust can also be formed and placed in the pan up to 2 days ahead with the weights. Just let it chill in the fridge covered.


Read the Comments +