


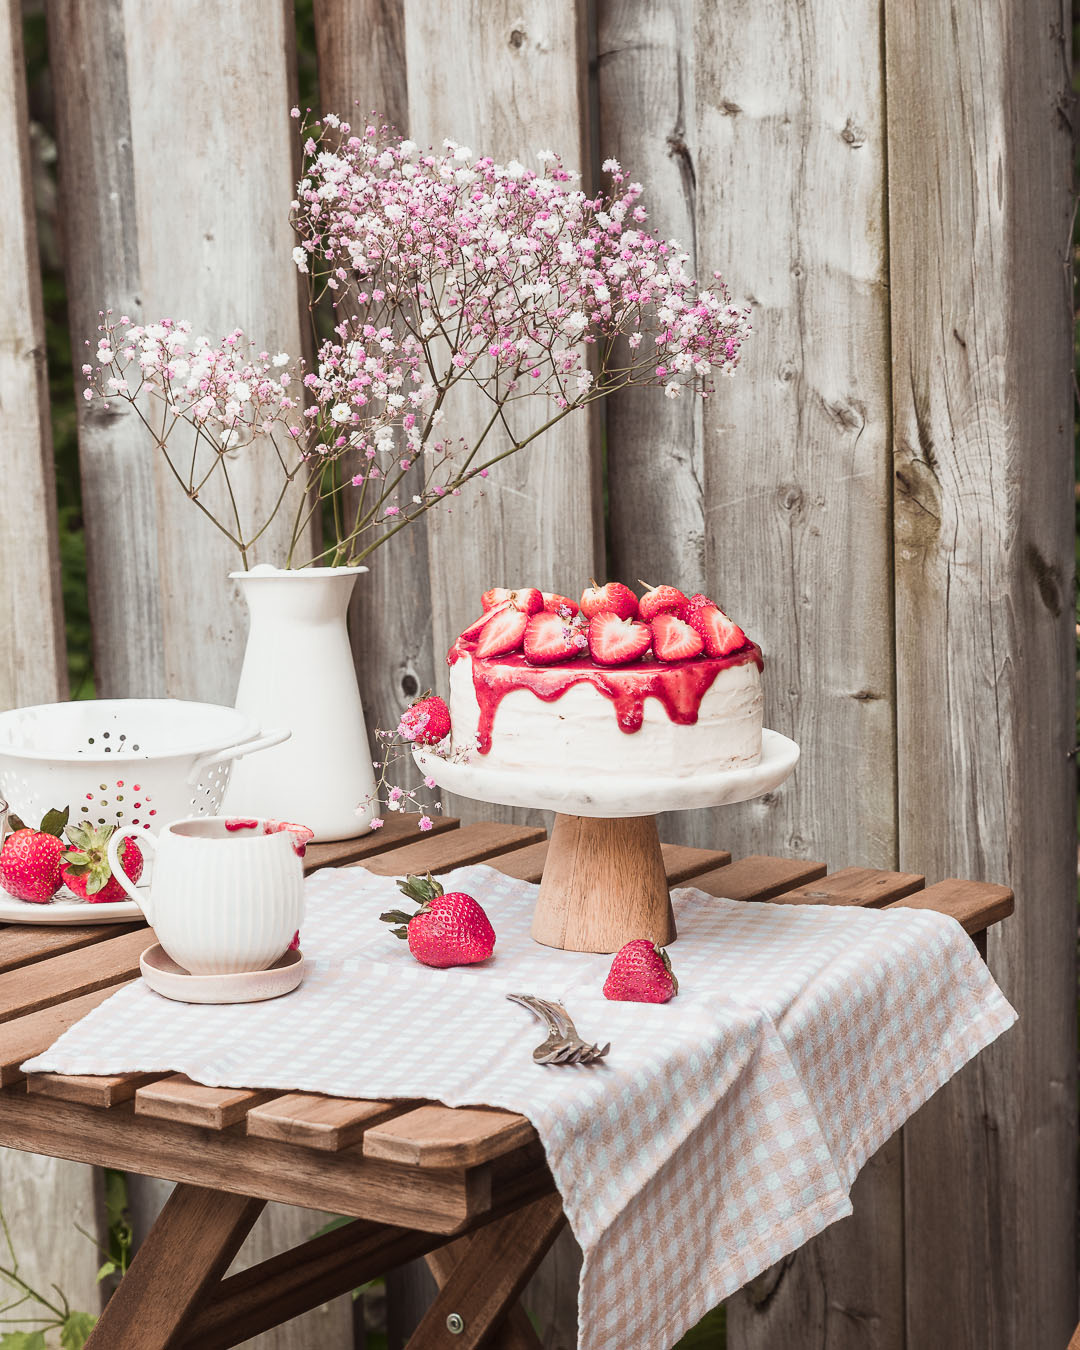


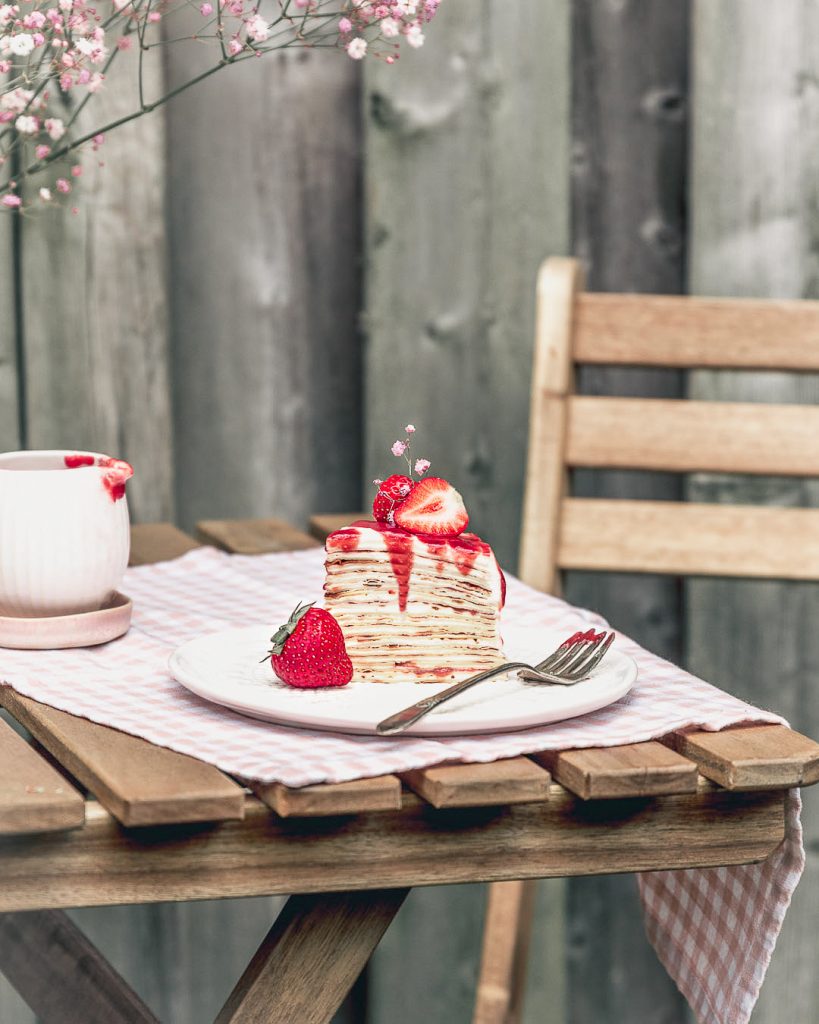
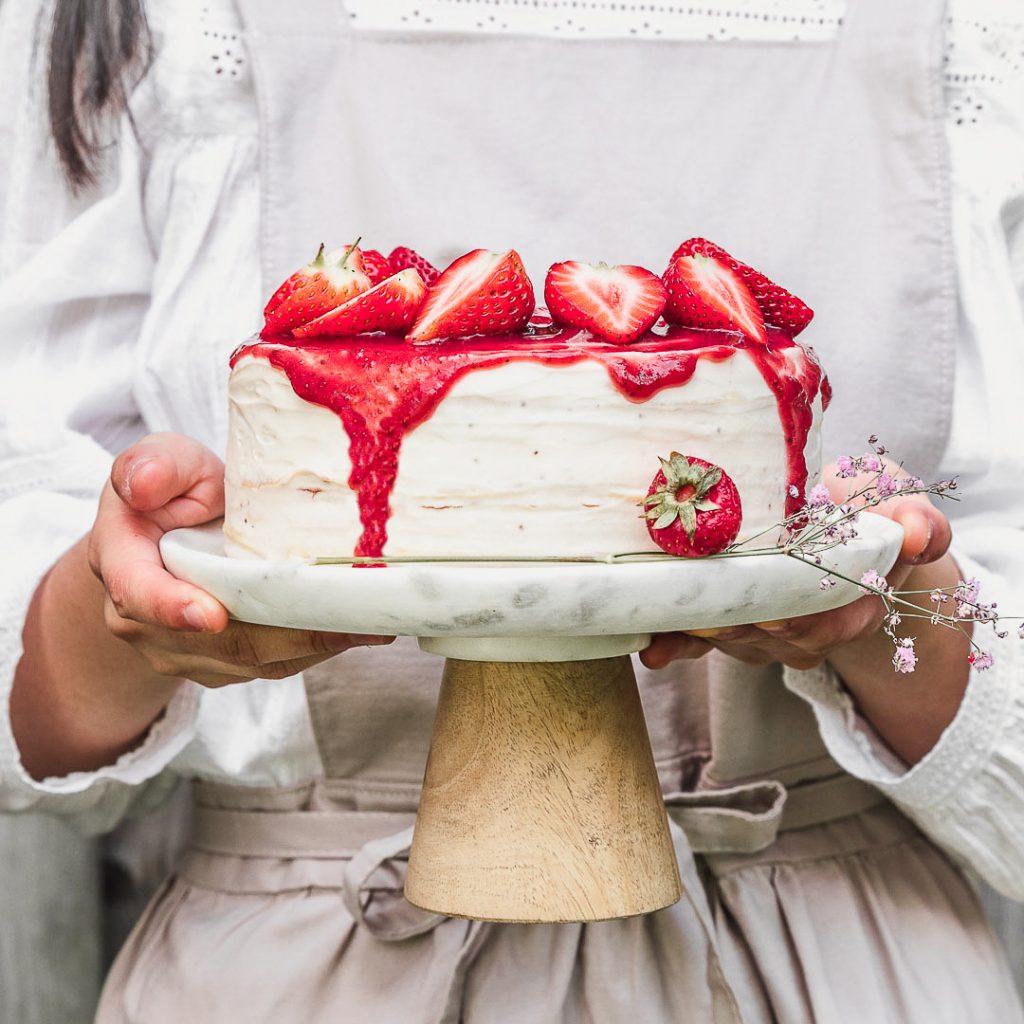
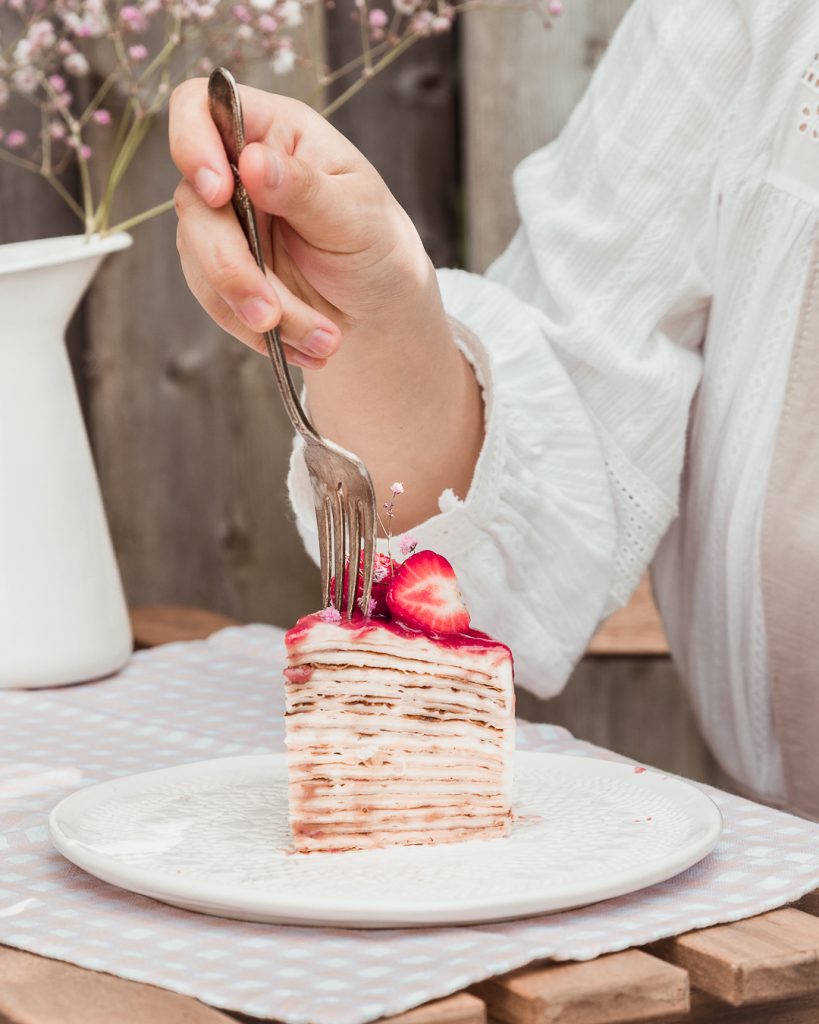
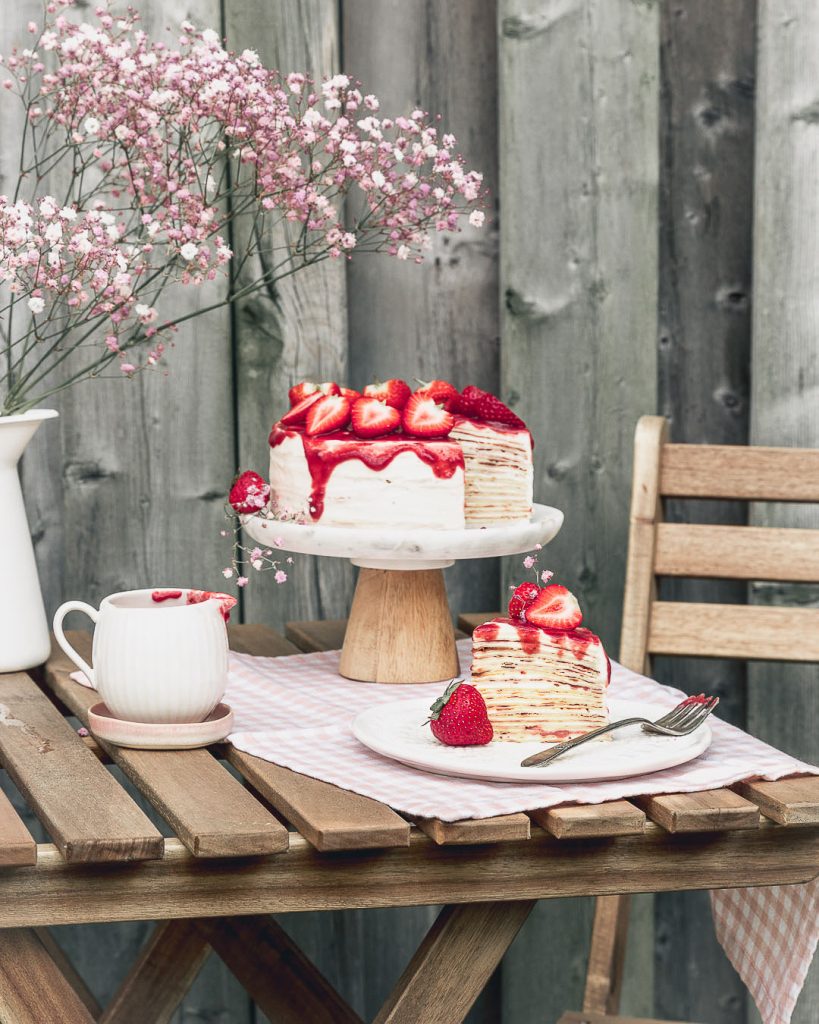
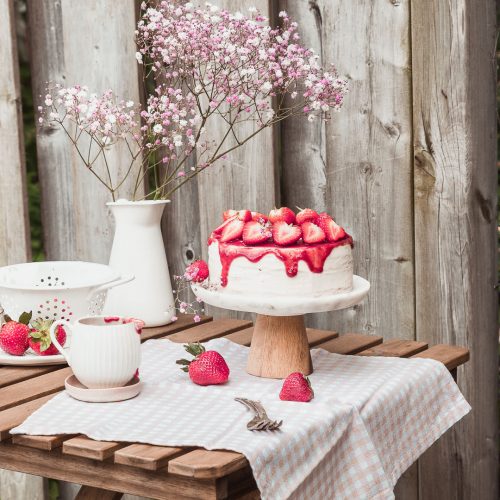
At first glance this Strawberry Crepe Cake seems unassuming and ordinary, but slice into this humble cake, and you’ll discover thirty paper-thin layers of vanilla crepes stacked with alternating layers of whipped cream and jam – not so plain.
Not only do the multitude of layers make this cake a showstopper, but as this cake chills in the fridge, the whipped cream and jam steep into the crepe layers. So when you go in for that first bite, all you’ll be tasting is a soft spongy luxurious cake.

What is a crepe Cake?
If traditional layered cakes scare you, because they definitely intimidate me, then this crepe cake is for you! Not only are crepe cakes less time consuming, they’re also very easy to assemble.
Crepe cakes are cakes made up of dozens of crepes – a thin pancake. Instead of frosting, crepe cakes are held together by whipped cream, pastry cream. Common flavors include vanilla, matcha, chocolate and other nutty flavors.
These cakes are also healthier and less “heavy” than baked cakes, so they’re considered no-bake, YAY! , perfect for afternoon tea, summer dinners and any occasion really!
Everything you need to know about this Strawberry Vanilla Crepe Cake
Before I made this recipe, I’d only tried crepe cakes at the storied Lady M cake boutique. They’re famous for their crepe cakes, but they cost a pretty penny – $55 USD per 6 inch cake. So, armed with the desire to save some cash…I decided to recreate this cake at home. With massive amounts of success, i’m here reassure you that this Strawberry Vanilla Crepe Cake can 100% be made at home, and, maybe it’s because I’m saving $55, but it tastes even better than store bought.
YIELD: This recipe makes one 6 inch crepe cake with 27-30 layers.
METHOD: The most intimidating component, but actual very simple, is making the paper-thin crepe layer. These are made with a large skillet similar to making pancakes (more details below). The homemade jam and whipped cream is made separately.
TEXTURE: Soft, spongy, creamy, this cake is all smooth and no bite. The most crucial step to this cake is the chilling stage, which soften the cake and give it that spongey texture.
FLAVOR: Don’t underestimate the combination of strawberry and vanilla. Together they are a powerhouse of deliciousness.
LEVEL OF DIFFICULTY: Intermediate. The homemade jam and whipped cream are very easy to make, but the crepe layers require some patience and practice. Don’t worry, because I have a bunch of tips below to help you nail the technique!
Ingredients & equipment to make a Strawberry Crepe Cake
INGREDIENTS:
- Whole Eggs – Since the crepes are so thin, the eggs not only add richness and fluffiness, but flexibility so they’re easier to flip.
- Granulated Sugar – For additional sweetness.
- Cake flour – Compared to All-purpose flour, cake flour is finer, so your crepes will be delicate and lump-free.
- Milk – To combine all the ingredients together. Feel free to sub in a dairy-free alternative.
- Unsalted butter – This is only for greasing the skillet to make the crepes.
- Heavy Cream – To whip up some whipped cream
- Gelatin Sheet or Powder – This is optional, but I like to add gelatin to stabilize my whipped cream so it doesn’t melt. This way the whipped cream will hold for hours. I personally prefer gelatin sheets, because they don’t have any aftertaste. For more tips and instructions on how to use gelatin, refer to this post here!
- One Recipe for homemade Strawberry Jam: You can sub for store bought, but there’s nothing quite like homemade! Here’s my recipe!
special equipment:
- 8 inch skillet – Ideally non-stick, but any large flat skillet will do for making the crepes
- 6 inch bowl, cake ring or cutter – To cut the crepes into perfect circles.
- Sifter – To ensure that your crepe layers are perfectly smooth, you’ll need a sifter to sift the flour.
- Angled Spatula – This little tool is amazing for spreading cream and frosting cakes.
How to make the vanilla crepe cake layers
Above is quick video showing you how to make the crepe cake!
STEP #1: Butter and heat the pan – Butter makes theses crepes nice and golden, so make sure your pan is ripping hot before you butter the bottom.
STEP #2: Pour and swirl the pan – Making thin crepes is all about the swirling technique. Once you pour in the batter, quickly swirl the pan, so the batter covers the entire bottom. Then let it be and cook for a minute.
Step #3: The Flip – Unless you’ve got strong arms, you’ll need a large spatula to help you flip. Gently lift the edges to check that the bottom is fully cooked. Then slide the spatula under and flip. Don’t force the flip if the bottom is still wet.
STEP #4: Butter & Repeat – Butter the pan again after each crepe, and continue the method until you’ve used all the batter.
STEP #5: Stack and cool – Stack them into two towers, on a large parchment paper lined baking sheet, and alternate placing them so the previous crepe has some time to cool before you place another. This prevents soggy crepes.
How to Assemble a crepe cake
You can refer to the video above to get a sense of how this cake is assemble, but here’s the method.
STEP #1: Trim the crepes – This is a super simple step, but with massive reward and makes your cake look clean and professional. Using a 6″ cake ring or a bowl, trim each crepe and discard the excess – this ensures your cake stacks perfectly.
STEP #2: Begin Stacking – Smear a bit of whipped cream onto a plate or cake board and place one crepe layer on – darkest side facing down.
STEP #3: Spread Cream & jam – Spread a thin layer (approx. 2 tbsp) of whipped cream onto the first layer of your crepe cake. I recommend using an angled spatula to easily spread the cream. Then layer with another crepe, but this time spread jam. Continue layering the crepes, but alternating between whipped cream and jam fillings, until you’ve used all the crepes.
Step #4: Frost outside – Lastly, spread the remaining whipped cream on the sides to fill up any cracks, then the top of the cake as well. Use a cake scraper or bread scraper to get a flat top and sides.
Step #5: Chill – It’s hard to be patient, but trust me this cake tastes best when chilled. Chill for a minimum of 4 hours or overnight so the crepes can soften and soak in the cream.
Making a crepe cake ahead and how to store:
Luckily, you can easily break up the steps for making this Strawberry Vanilla Crepe Cake. The crepes can be made up to 1-2 days before, just let them fully cool before wrapping in cling wrap and storing in the fridge. The whipped cream should be made the day of, and the jam can be made up to 3 days before.
Once the cake is assembled, serve immediately, but you can wrap any leftovers or place in an airtight container and store in the fridge. The cake will remain fresh for up to 2 days.
I hope you enjoy this Strawberry Vanilla Crepe Cake, and let me know in the comments below what crepe cake flavor you want next!
Till next time, Sharon
Make sure to tag me on Instagram @whiskfullyso and leave a review below if you made this recipe. I hope you loved it! For more delicious ideas follow me on Pinterest.
Strawberry Vanilla Crepe Cake
Ingredients
for the vanilla crepes
- 6 (approx. 300g) large eggs
- 40g (3½) tbsp granulated sugar
- 1g salt
- 3g (1 tsp) g vanilla extract
- 400g cake flour
- 1000g (4 cups) milk (see notes for substitutions)
- 50g (3 tbsp) unsalted butter melted
for the whipped cream
- 200g (¾ cup) heavy cream
- 30g (3 tbsp) powdered sugar
- 1 tsp vanilla extract
- 8g ( 1 packet) Gelatin (optional)
for the homemade strawberry jam
- 1 recipe for homemade strawberry Jam (link in notes)
Instructions
for the vanilla crepes
- In a large mixing bowl, whisk together the eggs, sugar, salt, and vanilla extract. Throughly sift in the cake flour, as to avoid lumps in the batter. Then stream in the milk and fold to combine until no streaks of flour remain. Cover and set aside to chill in the fridge for 30 minutes to 1 hour.
- Prepare a large baking tray by lining it with parchment paper.
- Place a non-stick frying pan over medium low heat, and allow it to fully heat up. Brush lightly with the melted butter. Using a 1/4 cup, pour butter into the center of the frying pan, and quickly swirl the pan to distribute the batter into an even circle that covers the entire pan bottom.
- Let the crepe cook undisturbed for 2 minutes or until the bottom is golden and no longer wet. Slide a large spatula under the crepe and flip. Let cook on the other side for another 30 seconds to 1 minutes. Remove the crepe and let rest on the prepped baking tray. Repeat, this process until you have 27-30 crepes stacked into 2 towers on the baking tray. TIP: Alternate placing the crepes on the towers so each crepe can cool and release some steam. Let cool completely.
for the whipped cream & jam filling
- Make the homemade strawberry according to recipe, and store in a glass jar, in the fridge until ready to use.
- For the whipped cream, first bloom the gelatin according to instructions then set aside. Pour the heavy cream into a medium bowl, and using an electric hand mixer, whip for 2 minutes or until medium peaks form. Then add the bloomed gelatin, powdered sugar and vanilla extract, before whipping to stiff peaks. Cover and store in the fridge until ready to use.
to assemble the crepe cake
- Using a 6 inch cake ring, bowl or cutter, trim each crepe cake to 6 inches in diameter.
- Smear a bit of whipped cream onto the bottom of a cake board or plate, then lay down one crepe layer - the darkest brown side facing down. Spread a thin layer of whipped cream (approx. 2 tbsp) onto the crepe, and spread to edges. *Using a cake turning table and angled spatula will be very helpful here* Layer with another crepe cake, but this time spread with jam.
- Repeat with the remaining crepes, alternating between whipped cream and jam, until you've used all the crepes. Leave the top layer bare, and cover the whole cake in whipped cream. Use a bench scraper or an icing smoother to get a flat top and sides.
- Chill the completed cake for a minimum of 4 hours to overnight, so the crepes have time to softened by absorbing the moisture from the cream and jam.
- To decorate: Pour-over the remaining strawberry jam, and top with sliced strawberries. Enjoy!
Notes
- Whole milk can be subbed for almond, oat or soy milk. Avoid coconut milk as that has a thicker consistency
- Cake flour can be subbed for All-purpose; however the cake will not be as light
- Crepes can be made up to 2 days before
- Whipped cream should be made the day of
- Homemade jam can be made up to 3 days before
- This cake remains fresh for 2 days when covered and stored in the fridge


The cake was super yummy! We used matcha and nutella instead of jam and it still turned out great 🙂 would definitely recommend this recipe!