


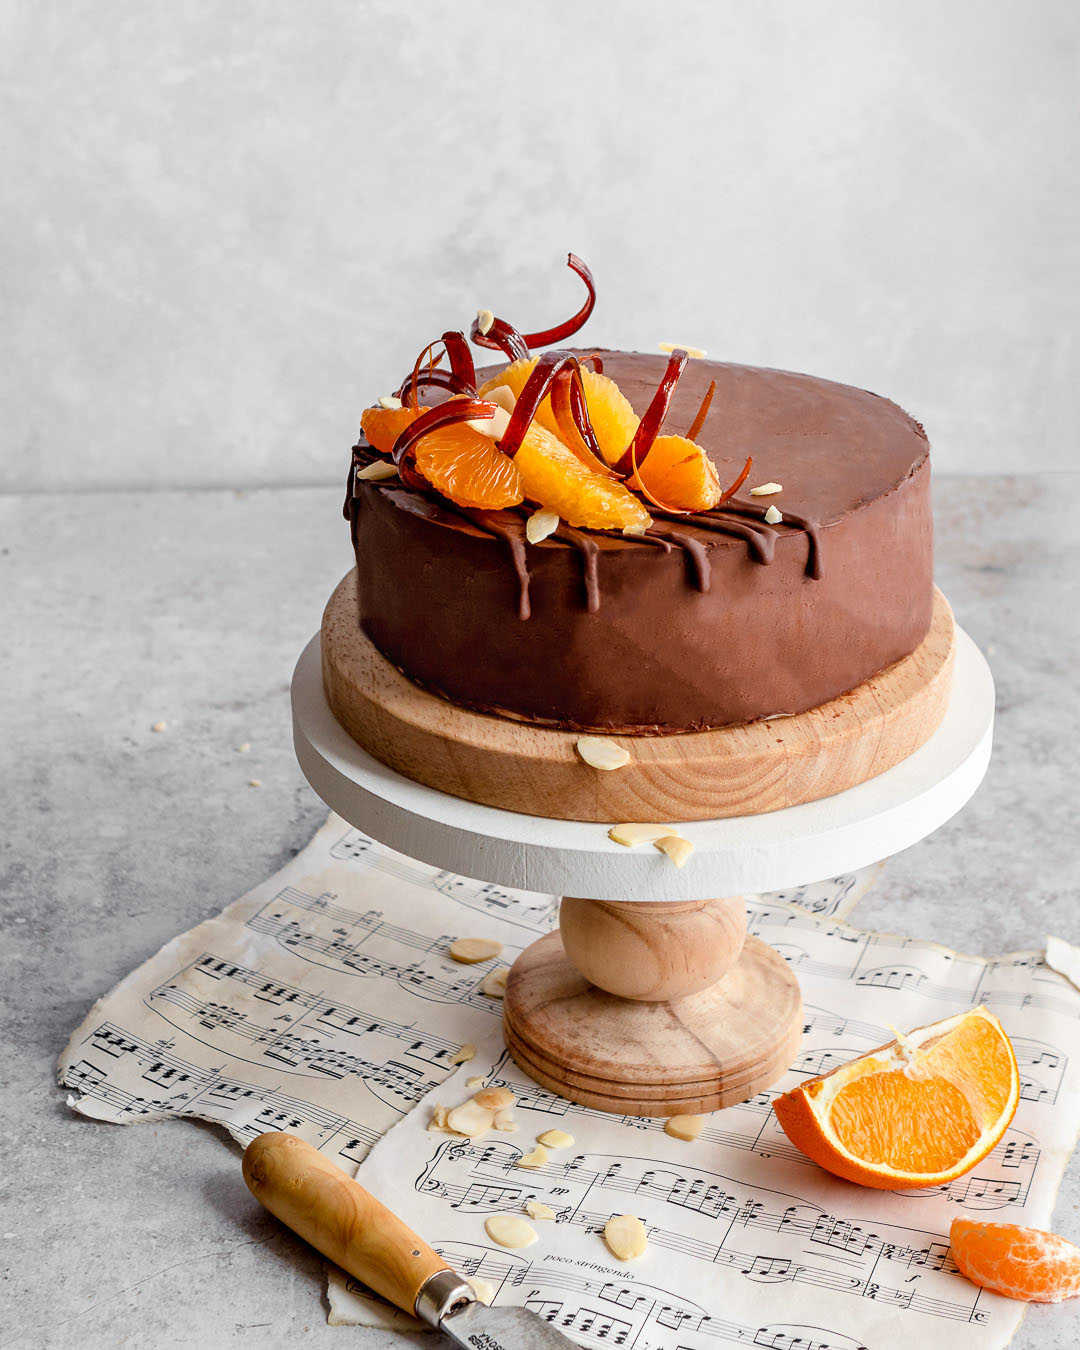


This Citrus Chocolate Layer Cake is the ultimate chocolate lover’s cake! With seven layers of heaven including: a crunchy hazelnut almond biscuit base, chocolate ganache, light chocolate sponge, tangy citrus curd, more fluffy sponge cake, creamy chocolate mousse, and (lastly) a dark chocolate glaze.
I know this cake seems like a lot, oh it is, but it will be THE BEST bite you’ve ever tasted! Trust me…this is the kind of cake worth waiting for! I’ll be guiding you through each step, so you can make this stunner at home.

Why this is THE BEST Citrus Chocolate Layer Cake
Okay, so I know, there are hundreds, no thousands, of chocolate cake recipes, that will take way less time than this cake. No doubt, those recipes are amazing…but here’s why you NEED to make this cake.
- It hits all the flavor points – This cake is sweet, bitter, tangy, salty and one bite will have the heavenly choirs singing. It won’t make you feel weighed down or bloated after because it’s balanced.
- You’ll learn new skills – each layer in this cake is designed to grow your skills as a baker. You’ll master meringues, custards, chocolate tempering, sponge cakes, and layered entrements.
If you’re looking for a quick no-fuss recipe, then unfortunately, this recipe may not be for you. However, if you’re looking for a show-stopper, and you love making pastries in the comfort of your own home then you’ve come to the right place!
the details in this Citrus Chocolate Layer Cake
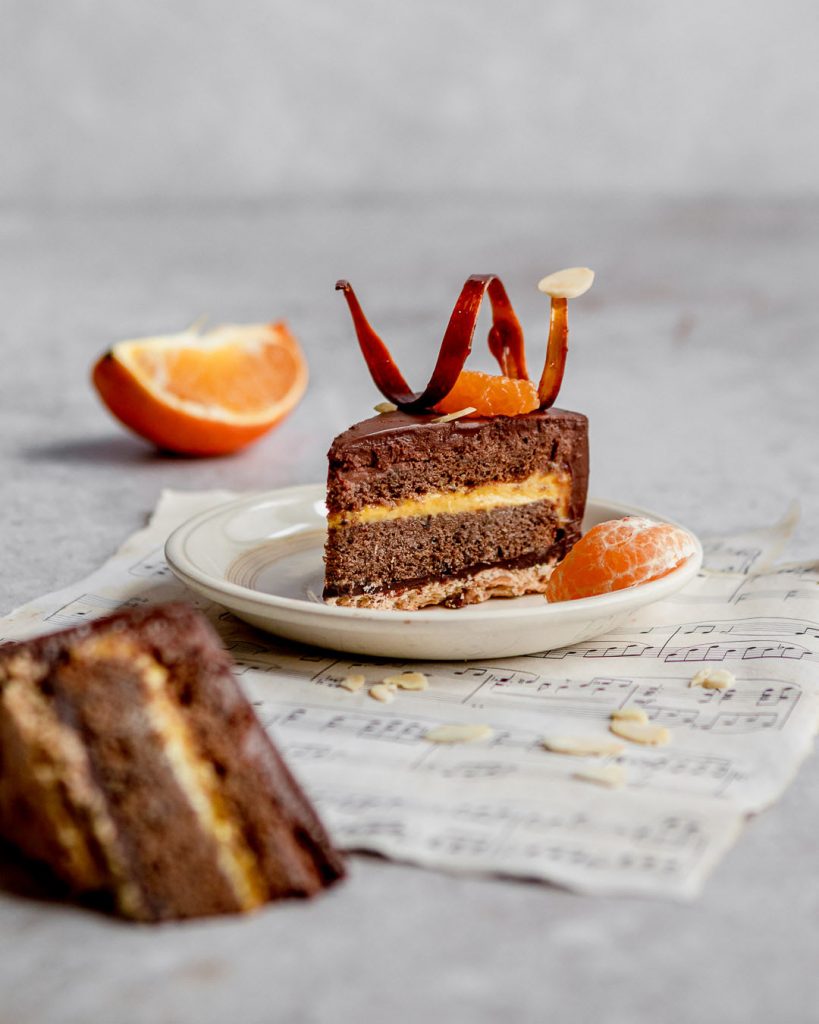
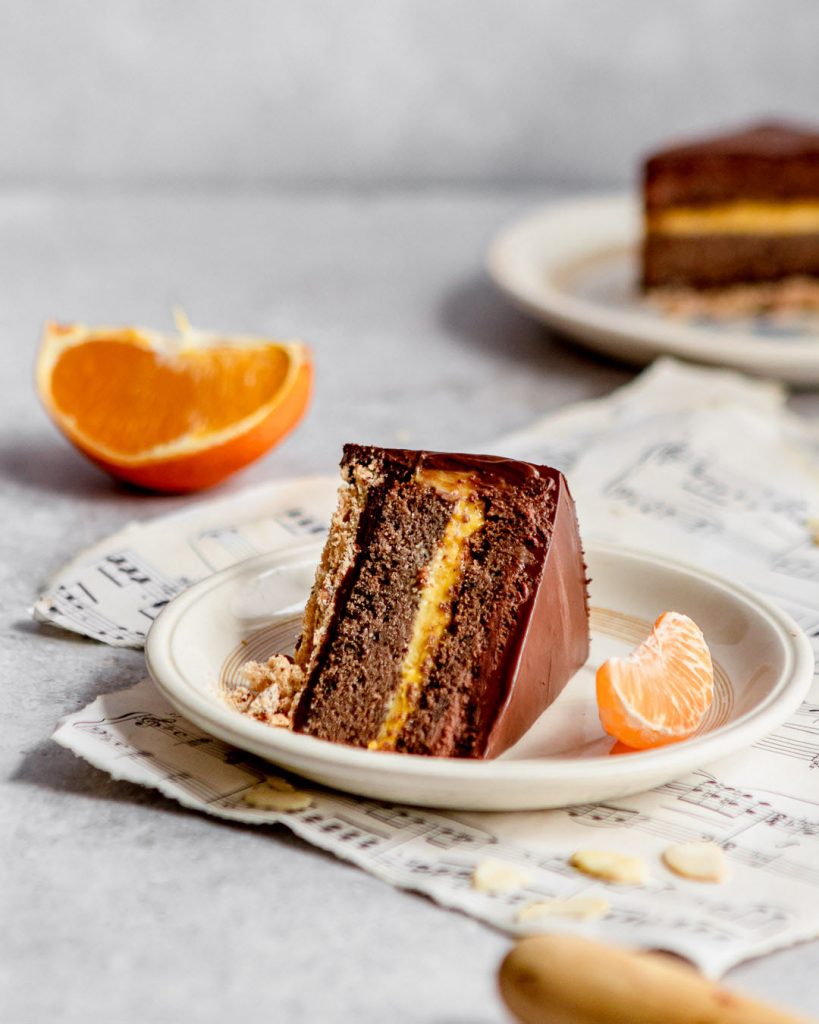
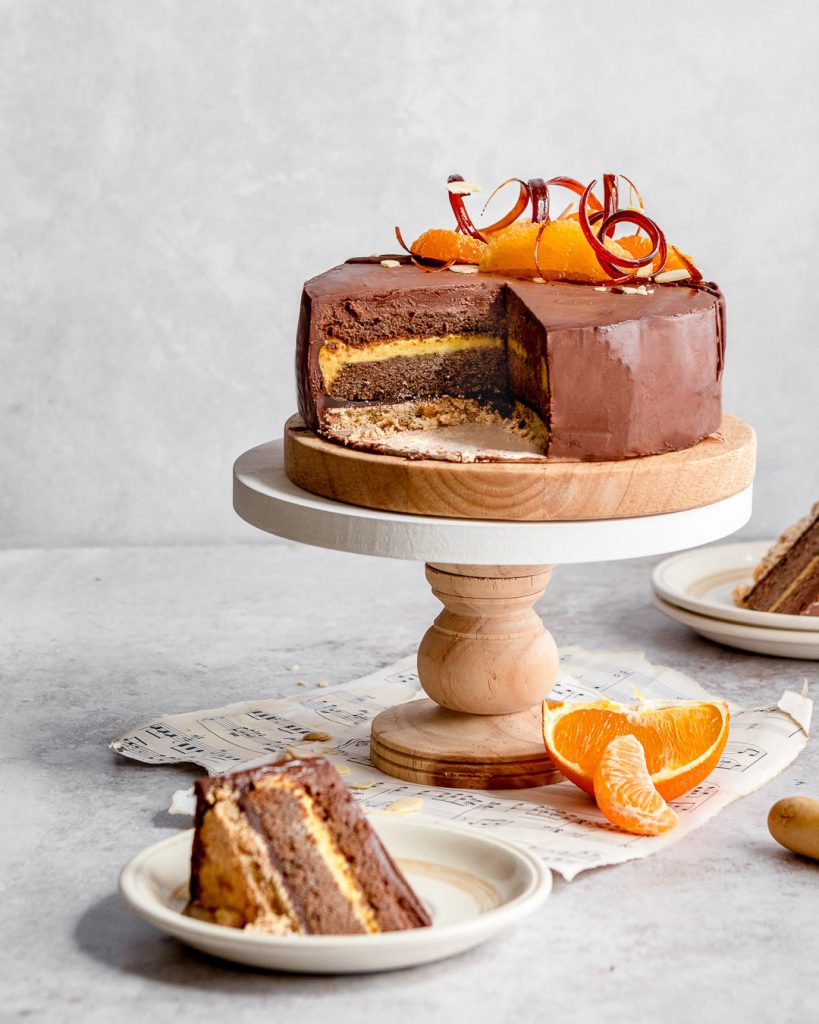
YIELD: This recipe makes one (1) six inch cake consisting of seven (7) different layers. Here are the layers:
#1 Hazelnut Almond Dacquoise
#2 Chocolate Orange Ganache
#3 Alhambra Chocolate Sponge Cake
#4 Citrus Curd
#5 Alhambra Chocolate Sponge Cake
#6 Chocolate Mousse
#7 Chocolate Glaze
TEXTURE: This cake is crunchy, airy, moist, and creamy all in one bite because each layer is different.
FLAVOR: Chocolate, chocolate, chocolate and with citrus sprinkled in here and there. I use both bittersweet and milk-chocolate in this recipe.
LEVEL OF DIFFICULTY: Advanced – I’ll be honest, this cake is not easy. It combines a variety of skills, some specialty equipment, and it does require patience.
Ingredients & equipment for making entrement layer cakes
This cake has seven (7) layers, each a different recipe. Here are the recipes you will need below. Listed in the order of usage. Each of the recipes have step-by step photos to follow.
#1. 1 recipe for Hazelnut Almond Dacquoise – this is the base of this cake. A crunchy meringue-based biscuit with the addition of nuts. Get the recipe here.
#2. 1 recipe for chocolate orange ganache – this will help adhere the sponge cake (layer #3) with the base biscuit (layer #1). Recipe below.
#3 & #5. 1 recipe for Alhambra Chocolate Sponge – this is the main cake layer in this recipe. It’s airy and uses very little fat. Get the recipe here.
1 recipe for Cake Syrup – this is a mixture of water, citrus (specifically for this recipe), and sugar for soaking the cake layers so they do not get dry. Recipe below.
#4. 1 recipe for Orange Curd – substitute blood oranges for navel or any other juicing orange of your choice. Get the recipe here.
#6. 1/2 recipe for Chocolate Mousse – This is the creamiest layer of this cake. Luckily, this is very easy to make and I have a fool-proof recipe here.
#7. 1 recipe for Dark Chocolate Glaze – this is for the final glazing and sealing of all the cake layers. Recipe below.
Milk Chocolate & Dark Chocolate – These will be used for the ganache and the glaze. make sure you use either bars or professional chocolate chips that are high in cocoa and can be melted easily. I recommend using only the finest chocolate (Callebaut, Valhrona, Guittard, etc.) to really get the most out of this recipe.
EQUIPMENT: All equipment needed specifically for each layer is included in its own recipe post. For assembling this cake you will need: 1) A long flat spatula or an angled spatula; 2) 1 six (6) inch round baking pan; 3) 1 six (6) x two (2) inch round cake ring; 4) Blow-torch for de-moulding.
Step-by-step instructions to make & assemble this Citrus Chocolate Layer Cake
Patience is very important when creating this cake. To make the process manageable it can be broken down into 3 major parts.
Part 1: Make all of the parts separately – This can be done the night or day before assembling. Make each of the layers individually, starting with the dacquoise biscuit base, Chocolate sponge because they need time to cool. Also make ahead the citrus curd so it has time to thicken. DO NOT make ahead, the chocolate ganache, chocolate mousse or chocolate glaze as these should be made right before using.
Part 2: Assemble – spend the second day assembling the cake following the step-by-step guide below stopping right before the chocolate glaze step until the day it will be served.
Part 3: De-mould, glaze & serve – 2 hours before you’re ready to serve, de-mould the cake, glaze, and let it chill in the fridge until ready to serve.

#1. Dacquoise Biscuit layer
First prep the cake ring by placing a six (6) inch round cake pad at the bottom of the ring. Then seal the mould with cling wrap so the cake pad won’t fall out. Place the first dacquoise layer into the ring mould. Using crumbs to seal in any cracks around the edges.
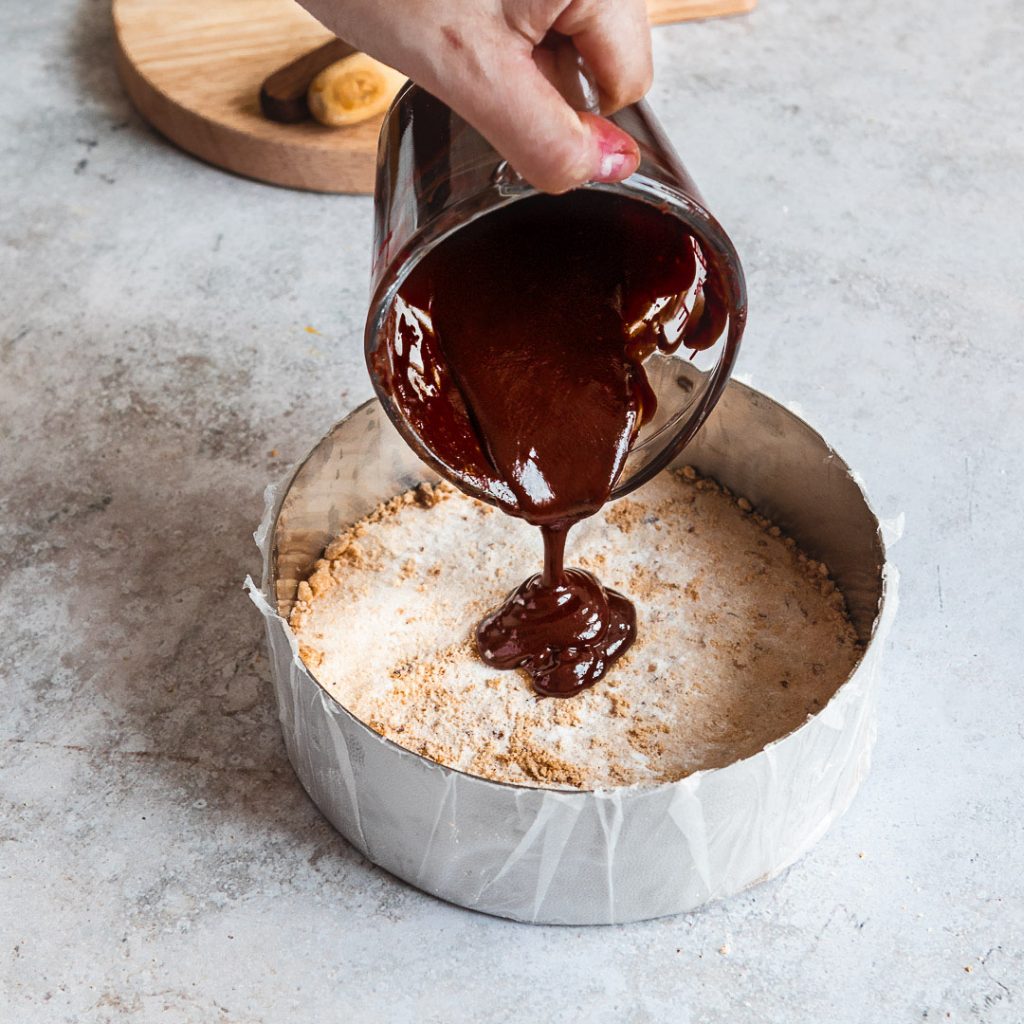
#2. Pour in chocolate orange ganache
Make the chocolate orange ganache and let it cool slightly. Pour the chocolate orange ganache on top of the dacquoise layer, and use an angle spatula to make sure there is an even amount all the way around.
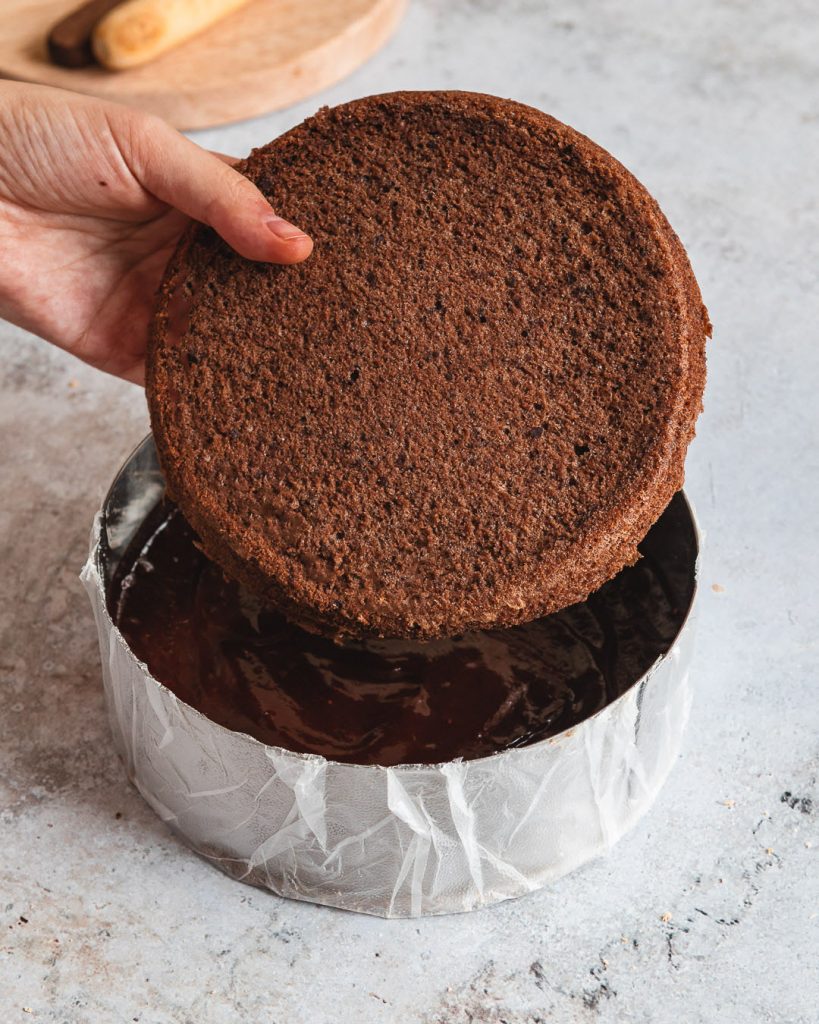
#3. Add in the chocolate sponge layer
Gently layer the Alhambra chocolate sponge cake on top of the chocolate orange ganache. Then brush the cake liberally with the orange syrup to prevent the cake from drying out.
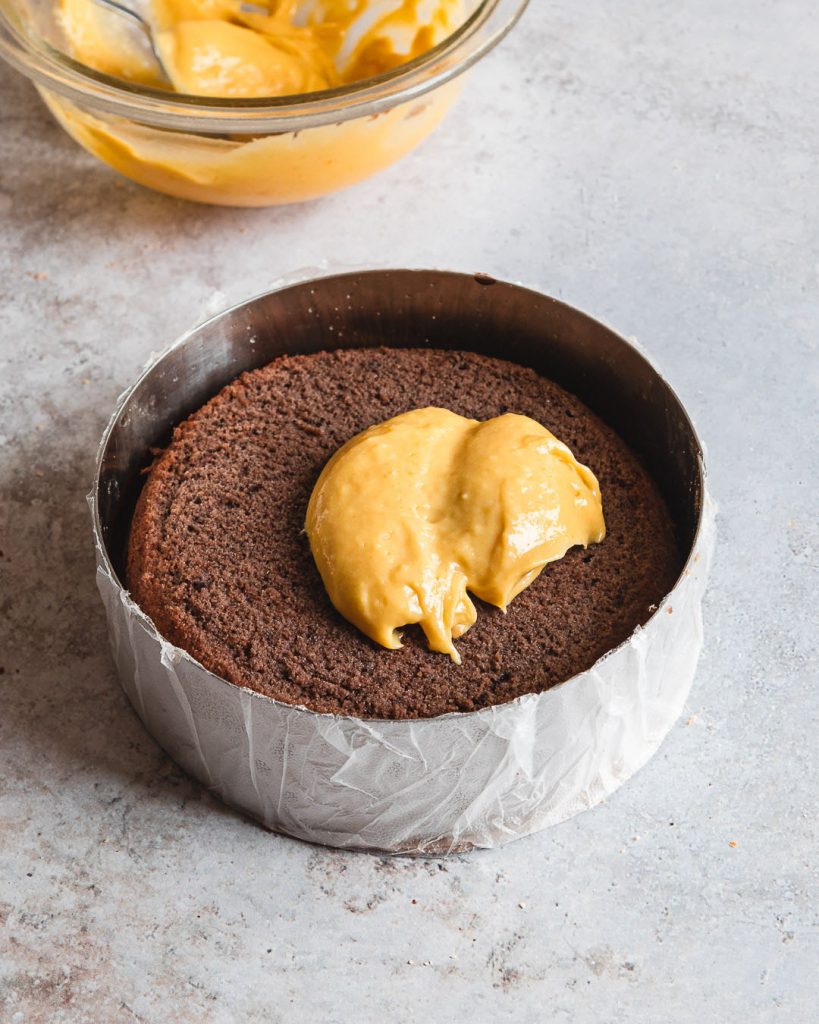
#4. Add the citrus curd
The citrus curd should have thicken to a jam-y consistency. Add a large dollop on top of the Alhambra sponge cake layer and smooth it out with the angle spatula.
#5. Add another layer of chocolate sponge cake
Top the orange curd with another layer of Alhambra chocolate sponge, and soak with orange syrup.
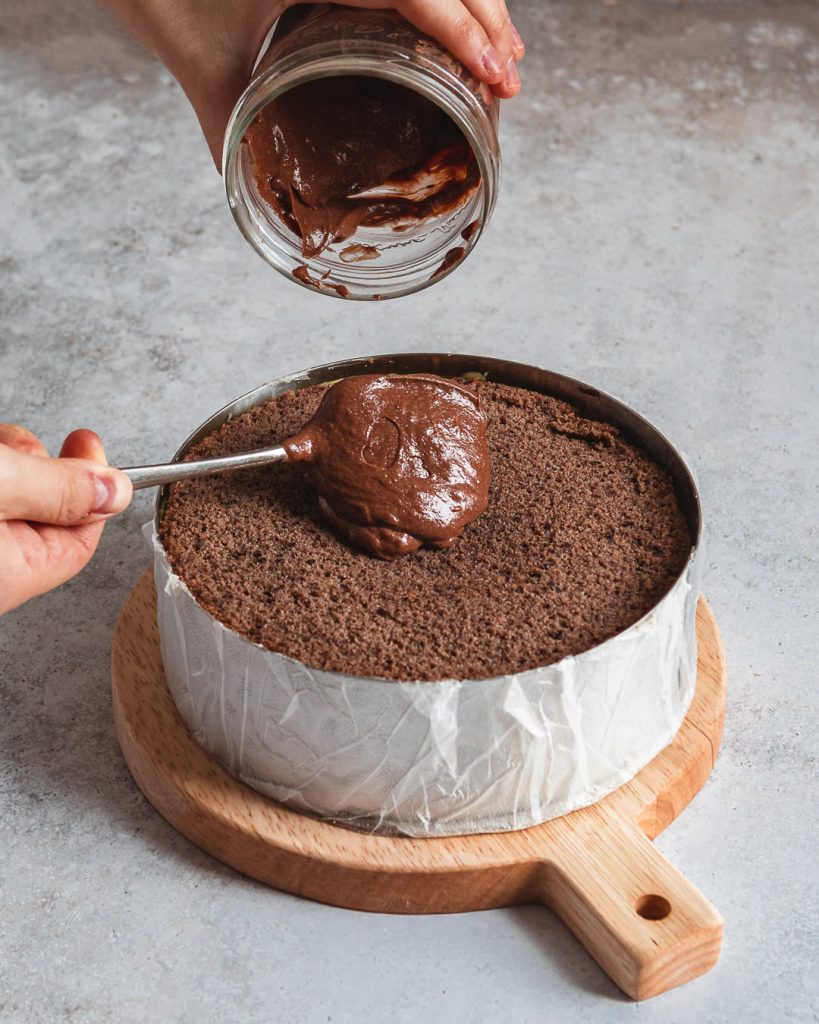
#6. Make the Chocolate Mousse
Cover the partially assembled cake, and chill it in the fridge while you make the chocolate mousse. Once the mousse is ready, Pour it on top of the second layer of sponge cake and level off. Do not cover, and freeze for 4 hours or more to set the entire cake.
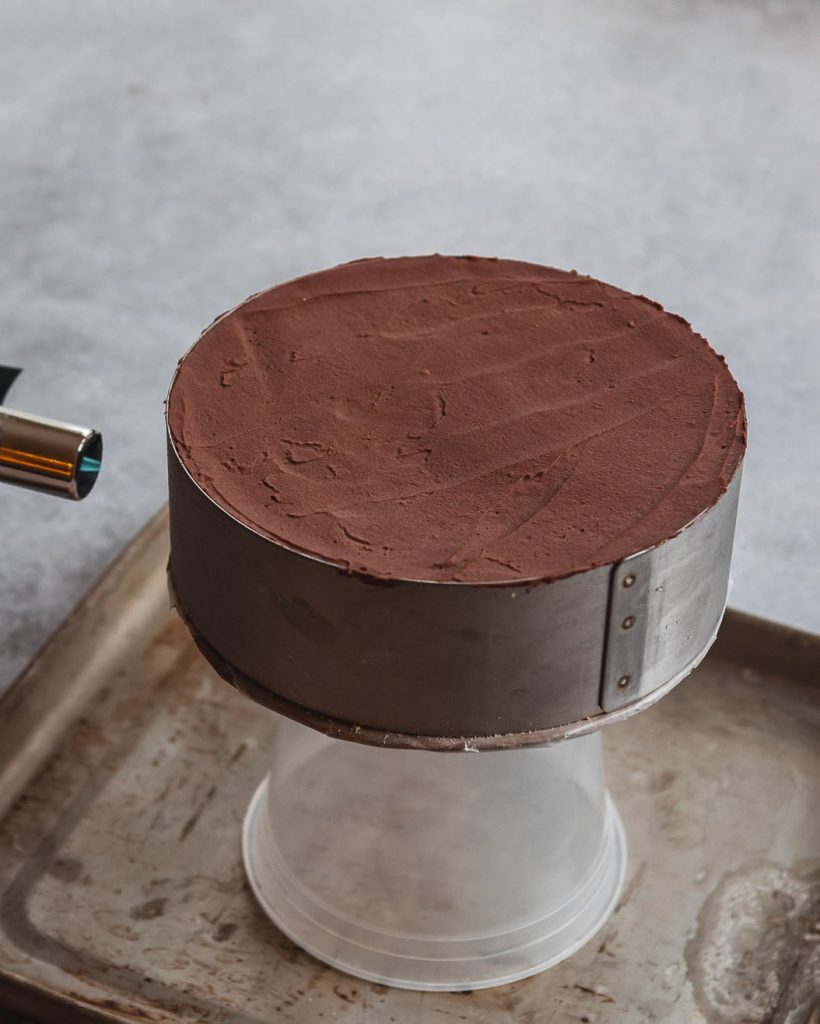
#7. De-mould the Cake
Now for the tricky part de-moulding. If the cake has been properly frozen, no liquids should be leaking from the ring mould. To de-mould:
- Remove only the cling wrap sealing the cake pad with the ring. Then place the entire cake (keeping the cake pad ) on top of a tall bowl or plastic container.
- Use a blow torch to lightly, defrost the cake ring from the cake by heating around the cake ring.
- Once the cake ring has been defrosted, gently use both hands to slide the cake ring up or down to release the cake.
TIP – Do not turn the blow-torch to high or the cake custard layers may melt.
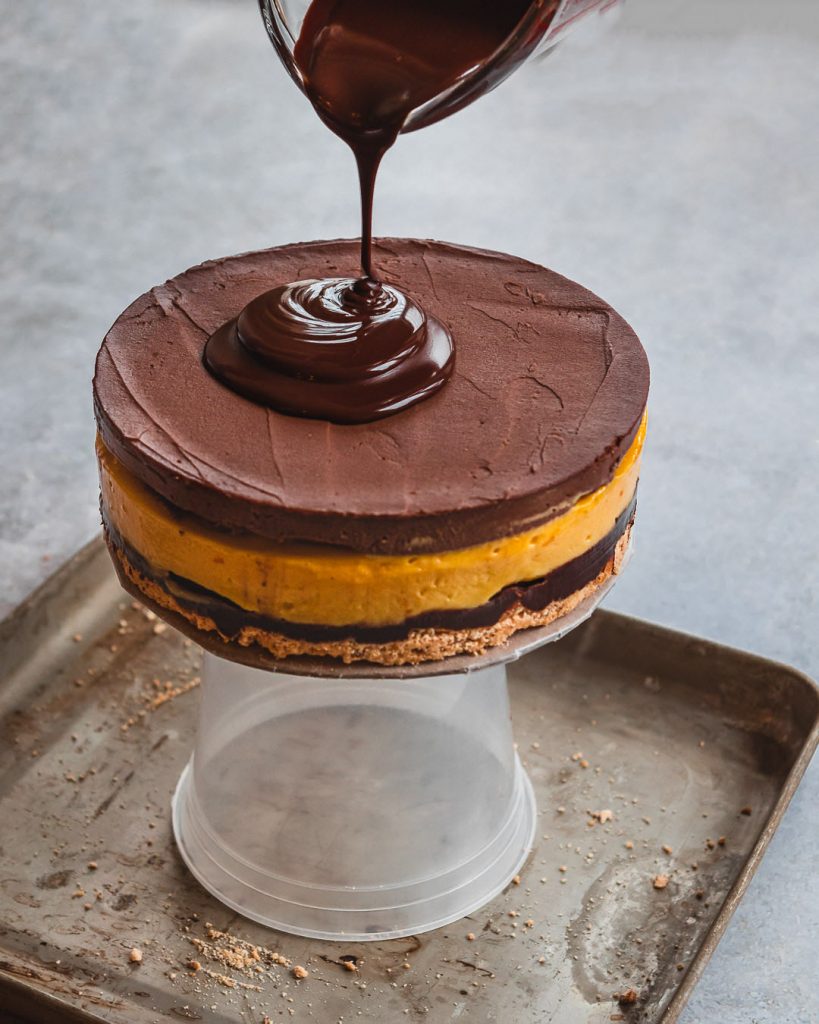
#8. Glaze the Citrus Chocolate Layer Cake
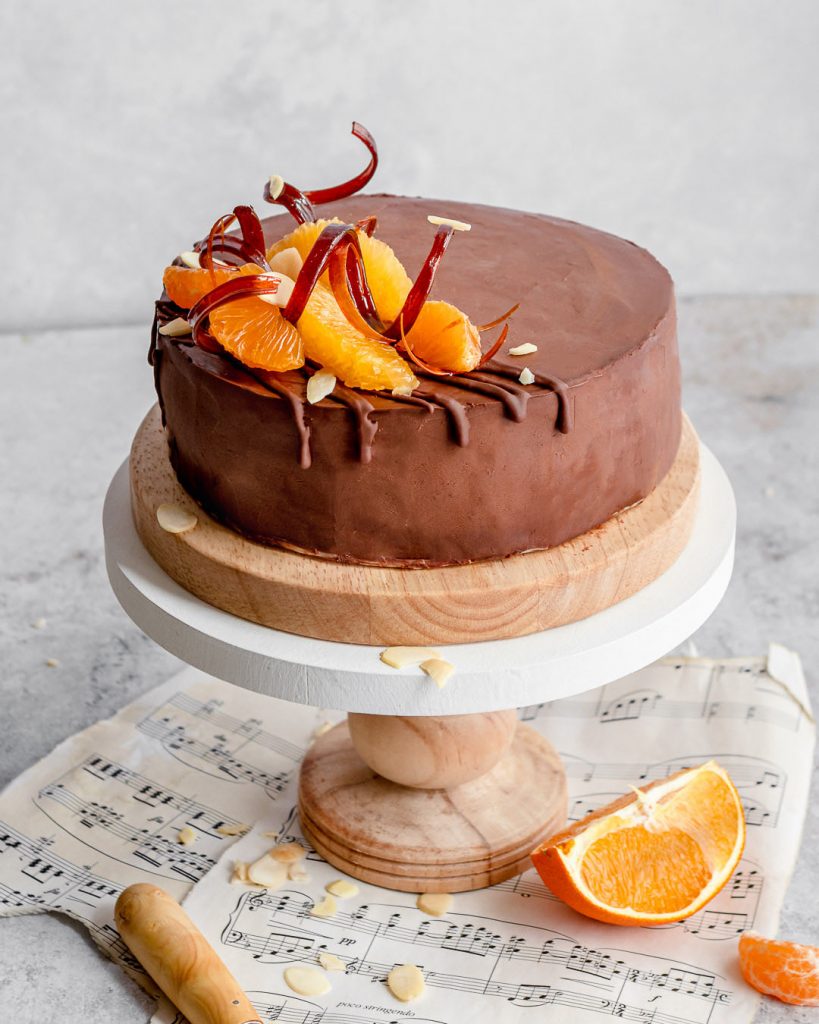
The final step! YAY! Glaze the entire cake with the dark chocolate glaze and use a spatula to smooth off any drips at the bottom. DO NOT use a spatula to smooth the top, you actually will create marks and the glaze will not be smooth. Instead, make sure the glaze is pourable so it will natural drip off of the cake. Transfer the cake to a plate, and store in the fridge so the glaze can harden. DO NOT freeze as the chocolate will get freezer burn.
How to store & serve this cake
You made it to the most easiest part eating the dang thing! Here are some details for storing and serving.
1. Use a hot straight knife to slice – For the cleanest slice of cake, first warm the blade under some boiling water. Wipe off any droplets then slice. Make sure you repeat the process and clean the blade in-between each slice.
2. To Store – When not enjoying, store the cake covered in the fridge. Or divide the cake into slices, store flat in an air tight container in the fridge.
3. Enjoy asap – This cake is best fresh. I recommend enjoying the cake within 4 days time or the cake will become dry.
YOU DID IT! This cake is NOT easy, so I’m so proud! I hope you learned a lot throughout this process, and even if it doesn’t “look” perfect, I guarantee it’s still delicious.
See you in the kitchen next week!
Sharon
Make sure to tag me on Instagram @whiskfullyso and leave a review below if you made this recipe. I hope you loved it! For more delicious ideas follow me on Pinterest.
7 layer Citrus Chocolate Cake
Ingredients
- 1 recipe for Hazelnut Almond Daquoise
- 1 recipe for Alhambra Chocolate Sponge
- 1 recipe for Orange curd
- ½ recipe for chocolate mousse
for the chocolate orange ganache
- 25g milk chocolate finely chopped
- 25g 66%+ dark chocolate finely chopped
- 15ml (1 tbsp) juice from an orange
- 25ml (⅛ cup) heavy whipping cream
- 3g unsalted butter softened
for the cake syrup
- 62ml (¼ cup) juice from an orange
- 25ml (⅛ cup) water room temperature
- 50g (¼ cup) granulated sugar
for the chocolate glaze
- 32ml heavy whipping cream
- 6g granulated sugar
- 5g honey or coconut oil
- 31g 66% + dark chocolate finely chopped
Instructions
Part 1: Make the cake components
- Follow the Hazelnut Almond Dacquoise recipe and pipe out 1 six (6) inch circle and bake until dry and easily removes from the silicone mat. Let it completely cool in the shut-off oven. Wrap in cling wrap until ready to use.
- Follow the Alhambra Chocolate Sponge cake recipe, and make 1 six (6) inch cake. Once the cake has cooled, carefully cut the cake into two (2) even layers. Wrap in cling wrap until ready to use.
- Follow the Orange curd recipe to make the curd, but replace the blood oranges with navel oranges. Once the curd is made, transfer it to a bowl, cover, and store in the fridge to thicken. Make sure the wrap is touching the surface of the curd to prevent a skin from forming.
Part 2a: Make the orange syrup
- Combine orange juice, water and granulated sugar in a sauce pan and bring to boil. Boil until all the sugar has dissolved. Leave to cool before transferring into a glass jar. Seal and store at room temperature until ready to use.
Part 2b: Make the chocolate orange ganache
- Place the finely chopped milk and dark chocolate in a heat proof mixing bowl.
- In a saucepan, bring the heavy cream to a low simmer, then pour the cream over the chopped chocolate mixing until smooth. Stream in the orange juice and softened butter, mixing until smooth and homogenized.
To Assemble: Part 1
- First prep the cake ring by placing a six (6) inch round cake pad at the bottom of the ring. Then seal the mould with cling wrap so the cake pad won't fall out. Place the entire wrapped ring on a small baking tray. Place the first dacquoise layer into the ring mould, filing the edges with a zester if necessary. Use any leftover crumbs to seal in cracks around the edges.
- Spoon in the prepared orange chocolate ganache and spread evenly with an angled spatula. Top with one layer of the Alhambra sponge cake and soak with orange syrup using a pastry brush.
- Next, spoon in the thickened orange curd and spread out evenly. Top with the remaining layer of Alhambra chocolate sponge and soak well with orange syrup. Cover the cake, and transfer into the fridge to chill while you make the mousse.
To Assemble: Part 2 - Make the chocolate mousse & finish assembling
- Make half of the chocolate mousse recipe, and use immediately. Do not allow it to set.
- Remove the cake from the fridge, and top up with chocolate mousse. Level-off any access with a spatula. Transfer the cake to the freezer to set for at least 4 hours - do not cover.
To Assemble: Part 3 - De-mould
- Place a tall plastic container in the center of a baking tray and remove only the cling wrap sealing the cake pad with the ring. Then place the entire cake (keeping the cake pad) on top of a tall bowl or plastic container.
- Use a blow torch on a low flame to lightly, defrost the cake ring from the cake by heating around the cake ring.
- Once the cake ring has been defrosted, gently use both hands to slide the cake ring up or down to release the cake.
To Assemble: Part 4 - Glaze
- Make the chocolate glaze by simmering heavy whipping cream, sugar and honey (or coconut oil) in a saucepan.
- Slowly pour the warm cream overtop the finely chopped chocolate in a heat proof bowl, mixing continuously until all the chocolate is melted. Let the chocolate cool to 86°F/ 30°C before using.
- Pour the cooled glaze over the cake, making sure the glaze coats the sides. Use a spatula to smooth out the drips on the bottom edge. Transfer the glaze cake off of the container and to a tray.
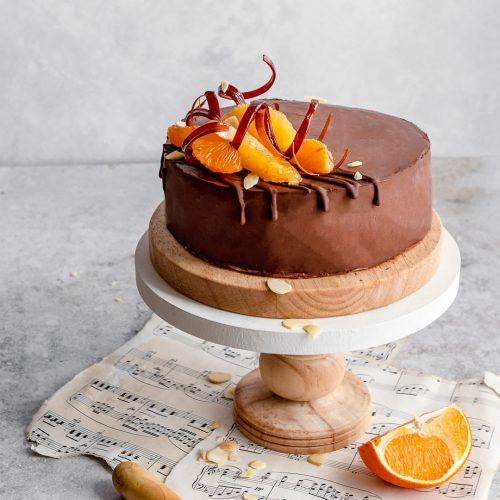
- Chill in the fridge for another 2 hours or more before serving so the glaze can set. Garnish with orange slices, and chocolate curls right before serving. Enjoy!
Notes
- For information on how to make in stage, please refer to recipe post.
- This cake is best enjoyed immediately or within max 4 days for freshness.


Read the Comments +